Wednesday, July 15, 2020

Over a Few Days: Teak Varnish/Oil, Bottom Paint, Prepping for Aft Chainplate Install, and Mounting Pads


July 12 - 15


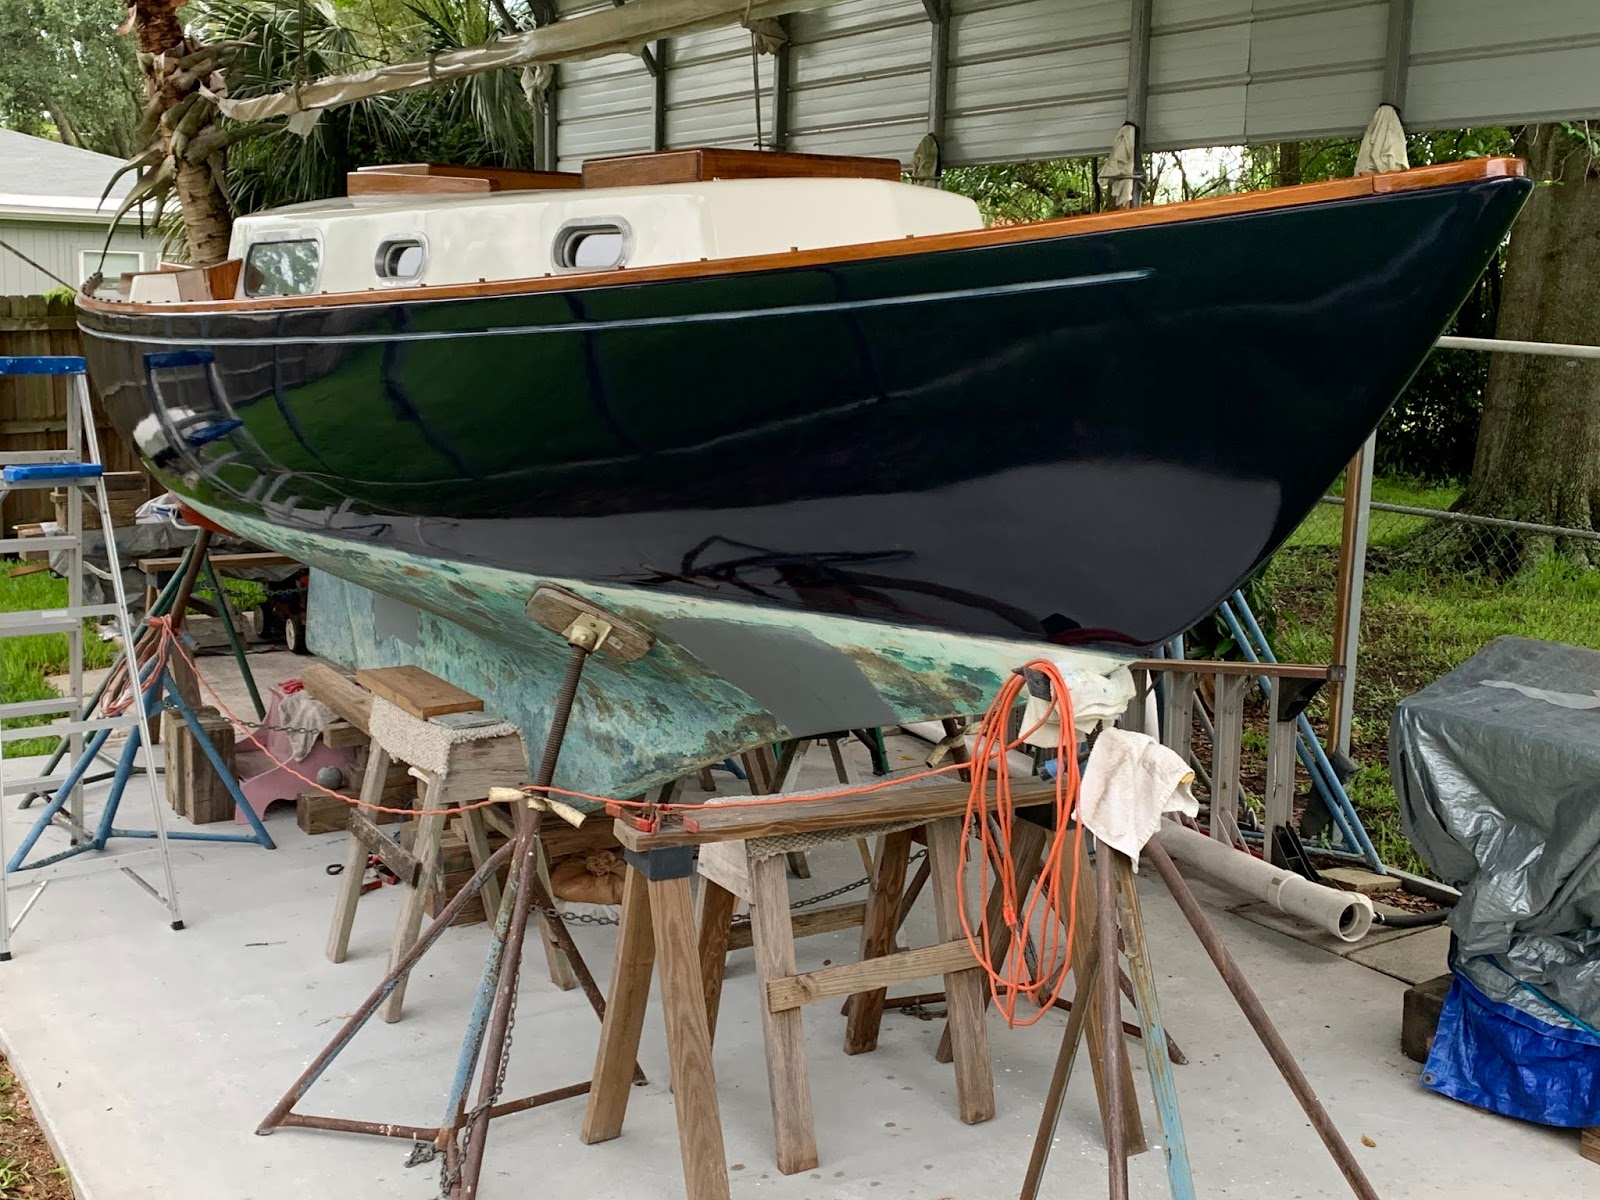
With the Allied 24 now out of the shop and into the boatyard the work continues, albeit offsite.  I wanted to begin rebuilding the varnish on the toe and taff rails after having installed bungs to cover and protect the fasteners.  Over a half-hour period of time on Sunday, I cleaned up and applied a coat of varnish.  As can be seen, the boat is a bit bow-down, and will be leveled out in the coming days.


Since the boat was out in the open, and anyone working on her exposed to the harsh Florida sun, I chose to grab a couple hours in the very early morning hours, and prior to the day job responsibilities.  Monday morning was spent removing the topsides tape line for the waterline - applied just prior to the start of applying the six coats of topsides paint - cleaning up the tape adhesive residue, and then reapplying / restriking the waterline to apply a bit of bottom paint.  I chose to raise the new waterline by roughly 1/4" above the previously chose waterline, and also slightly raise the waterline as she moved forward to the bow, mirroring the rising sheer line of the deck.  With the tape line established, I began to sand from the line down roughly ten to twelve inches to thoroughly scuff the surface and remove loose paint.  After cleaning up the surface of sanding dust, I applied a bit of Petit bottom paint.


Tuesday morning was spent prepping for the installation of the 650W Torqueedo battery charger unit, as well as a couple Torqueedo BUS/CAN electronics gateways.  I laid out the installation of the remaining Torqueedo components at home, which helped me to identify the best layout on the boat.  I sanded to remove paint and down to bare fiberglass.


Next, I moved to the aft of the boat to begin the layout and install prep for the aft chainplate.  The owner is having a rigger install the chainplates, as well as additional rigging hardware and the raising of the mast and tuning.  Since I had glassed in the previous fastener holes and applied a G-10 backing plate for the aft chainplate, I wanted to mark, drill and tap for an eventual chainplate installation.  

I established the location of the new aft chainplate, and transferred the location of the fasteners to a layer of protective tape I applied for this process.  With the location of the fasteners established, I then proceeded to drill and tap for 1/4-20 fasteners.  


The aft chainplate ready for installation by the rigger.


While I was at the boat, I applied teak oil to the lazaretto shelf fiddles.


In the evening of the same day, I headed over to the shop to fabricate a few pieces for the interior.  With the installation of the new primary bulkheads, the location of the vertical plane related to the deck penetration for the upper chainplates had been slightly altered.  This opened a bit of a gap both on port and starboard, and as such required two spacing blocks to be fitted between the chainplates and the bulkheads themselves.  These were fabricated out of teak, and will be provided to the rigger for installation.


My next task was to create a mounting pad for the Torqueedo charger to be mounted onto.  This mounting pad would be epoxied to the interior surface of the cockpit well, aft of the port cabin settee, and the charger would then be secured to it with fasteners.  I fabricated this mounting pad from a piece of 3/4" meranti plywood - a hi-grade marine mahogany plywood with no voids.


I also fabricated a mounting pad, this time out of teak, to secure the BUS/CAN gateways for the Torqueedo electronics.


Wednesday morning, I got to work gluing the mounting pads to the interior surface of the cockpit well.  After cleaning up both the mounting pads and the fiberglass with acetone, I then applied neat epoxy to the surfaces, followed by a generous amount of thickened epoxy.  I had routed grooves into the glue surface of the mounting pads to provide more surface area and thickened epoxy volume for a more secure install.  Just prior to "sticking" them on the fiberglass surface, I applied globs of hot glue to the corners to assist in keeping things in place while the epoxy cured.  

The boards went up without issue; further Torqueedo component installation to come next.


Total Time Over These Days:  7.75 hrs


Wednesday, July 8, 2020

Deck Hardware Install, Trimming Bungs, and Painting Non-Skid


July 8, 2020


I arrived at the boat early today, and expected to get accomplish the major items prior to her departure - in the coming day.  I started with the deck hardware since I had plans later in the day to varnish and apply non-skid paint.  I broke down the winches to start things off...and set them upon the templates that I used to fabricate new teak pads for the coaming cubbies.  


I arrived at a satisfactory location on the coaming cubby pad to mount the winches.  I then removed the winch base, applied protective paint, and the reset the winch base in order to mark for fasteners.


I pre-drilled for #12-24 machine screws, and tapped the holes.  


With all the holes drilled and tapped, I set the winch base in place.  I then installed the 6 machine screws, and applied a couple washers (one being a locking type), and a locking nut to each machine screw.


I secured the nuts tight to their washer base, completing the installation.


I then turned to the deck cleats: 2 on the aft deck and 1 on the foredeck.  In the shop, I grabbed some fiberglass panels that I had originally removed from the boat - during the deconstruction phase and decided to use those for the backing plates.   From the fiberglass panels I cut backing plates for the cleats, marked for the fasteners, and then drilled holes to accommodate.  


In previous work sessions I had laid out the cleat positions, and marked for the fasteners in order to over-drill and fill with thickened epoxy - isolating any potential water ingress from the fresh, new balsa coring recently installed.  I applied Sitka-Flex 291 LOT to the point of install, and screwed down the cleats so that roughly a half-inch of the machine screw was showing on the underside of the deck. At this point, I applied the backing plate and washer/nut combo.  Back up on deck, I continued to drive the machine screw into place, seating it well.  I then went back down below to tighten the backing nuts.  Once again, back up on deck I cleaned up the squeeze out and generally tidied things up.


My next task for the day was to trim the bungs on the recent install of the toe rails, bow cap, taff rail, and aft cockpit trim board, and the coaming block pads.  I worked my way up and down the rails with a small Japanese saw.  Having worked my way through all of the bungs requiring trimming, I then sanded to smooth out the surface and ready it for varnish.  Unfortunately time (or daylight rather) would run out and force this task to another day.


I could not yet varnish the toe rails, taff rail, coaming block pads, etc., since I also needed to sand the deck and cockpit surfaces that would have non-skid applied to them.  So I turned my attention to the taping off of the non-skid pattern, starting in the cockpit.


I worked my way around the side deck to the bow and then back down the other side of the deck, tapping and trimming as I went.  I finished the taping on the cabin top...and then sanded all of those aforementioned surfaces! Clean up was with a vacuum, followed by a rag and acetone.  


I grabbed the Interlux Interdeck, necessary painting materials, and then headed to the boat.  I started on the cabin top, and then headed into the cockpit to work from the inside-out.  


I finished by working my way around the side decks to complete the non-skid paint.  


Total Time Today: 12.25 hrs

Tuesday, July 7, 2020

Torqueedo Motor and Electronics Box Install, Non-Skid Taping, and a bit of Plumbing


July 7, 2020


I started the day by creating a template for the Torqueedo electronics box, in order to mount it onto the bulkhead supporting the cockpit sole.  I placed the template in position and then drilled for the 4 #10 machine screws that I would use to secure it to the bulkhead.  


The electronics box required that I first install the positive and negative (as well as data wire) wires from the lower unit prior to mounting it onto the bulkhead.  So, I turned my attention to mounting the lower unit...the business end of the motor.  I had a bit of fine-tuning to do on the holes I had previously drilled into the counter of the Allied - to accept the tubing/wiring of the motor.  After finishing the fine-tuning work, I thoroughly vacuumed and wiped down the surfaces to prepare for bedding compound and installation.  I used a saw horse to support the motor, as it was partially inserted into the counter.  With the motor supported, and having full access to the mounting block and mounting flange, I then liberally cooped up the surfaces with Sitka-Flex 291-LOT.  I then pressed the motor further into the counter, and supported it with a wood wedge.


I scrambled up into the cockpit, and with a wrench, then fully secured the motor to the counter of the boat.  As can be seen, I had good squeeze out of the 291-LOT.  


I cleaned up the squeeze out, and then admired the install.  My fabrication and planning work on the install had the motor angled slight down, moving forward to aft, and the angle is apparent in the photo.


The alignment along the centerline of the boat is also dead-on.  


With the business end of the motor installed, and wiring running through to the electronics box, I could now secure the wiring in the box, close the panel, and mount the box to the bulkhead.


The installation was easy enough, a bit fussy with the up and down and in and out of the boat, but she came together as planned.


The view in the lazarette hatch, showing the wiring from the lower unit moving through the aft cockpit bulkhead (protected with chaff gear) and forward to the electronics box.


The view of the port side cockpit locker, housing the electronics box.  At this time, I also chose to install the plumbing line from the cockpit seat gutter to the cockpit sole.  The gutter (just below the coaming boards, gathers water and then funnels it into the cockpit, to then be delivered overboard by way of the seacocks.


The starboard cockpit gutter plumbing installed as well.


Total Time Today: 7 hrs

Lazarette Hatch Support, Taff Rail, and Coaming Block Pads


July 6, 2020


Today's work mostly revolved around the aft portion of the boat.   I started with  installing hatch supports for the lazaretto hatch.  This required that I fabricate mounting blocks for the hardware.  I first tied off the hatch in the open position, and then fabricated the mounting blocks out of teak, sanding through to 320 grit paper.  I pre-drilled the mounting blocks for fasteners and then assembled the mounting blocks to both port and starboard supports.  


Next, I placed the supports in position, and marked for their installation by taping off the boundary for he mounting block on the underside of the hatch as well as the forward and aft boundary of the block to be located on the lip of the lazarette itself.  With the mounting blocks' final resting place positioned, I dissembled the blocks from the hardware and predrilled on the underside of the hatch.  

At this point, I was ready for installation...meaning using epoxy to glue the mounting blocks in final position.  I ground off a bit of fiberglass on the lazarette well and roughed up the underside of the hatch.  I then applied epoxy resin (neat) to the surfaces, mixed in some colloidal silica in the remaining resin, buttered up the backsides of the mounting blocks, and then set them in position.  I secured the upper mounting blocks with fasteners into the underside of the hatch, and the lower mounting blocks were secured with vices.


Later in the day, with the epoxy near fully cured, I closed the hatch.  I did have to do some chisel work on the upper mounting blocks to allow for a neat and tight fit, but that was accomplished fairly easily.


In the course of the day's work I managed to fabricate two new coaming block pads.  I selected a couple pieces of scrap teak, took a bevel reading on the cabin sides to coaming block angle, and then cut that angle on the soon to be new coaming block pads.


I then figured out the sizing of the pads, and made the appropriate cuts followed by  finish sanding to shape.  I finished the coaming block pads with a couple fastener holes cut into them, using a forstner bit.


I installed the starboard coaming block pad, followed by the 3/8" bungs, and then varnished the pad in situ.


I replicated the efforts on the port side coaming block pad.  In the next day or two, I will trim the bungs and repeat the varnish work.


Total Time Today: 6.25 hours

Sunday, July 5, 2020

Installation of Bow Cap and Toe Rails


July 5, 2020


The day after the shelling...amazing how a 17-month year old sleeps through the barrage! We walked outside last night and witnessed a celebration of the birth of nation with literally 360-degrees of professional fireworks being let off - it was shock and awe!

On the boat today,  I arrived just prior to noon, and then got straight to the toe rail installation.  Since this was a one-man job, I knew I had to jump straight into it to finish at a decent time...and with a decent amount of daylight left.

The photo below shows the installation of the port toe rail, but not the engineering that went into its installation.  


I use a series of lines to both support the lengthy, flippity-floppy piece of brightwork and to elevate it to the correct position.


Once I have the rail in the proper position, I begin ticking off the 1/4-20 fasteners, until I reach a point in the curve of the deck that I need to reposition the lines to effectuate moving the rail into its new position.  The process, being one person left to it, is an up and down, back and forth, inside and out round-about kind of job...and did I mention I happened on to 9 stitches in my right foot on July 1st?  My sympathy pleas....I managed.


With the port and starboard toe rails on, as well as the bow cap, I returned to the shop and began cutting 1/2" bungs to cover the toe rail fastener holes.  I managed through 3 pieces of scrap teak from the original stock, and then removed the bungs by gently leveraging one side.  


I slightly thinned a bit of Epifanes varnish, grabbed a few tools and headed to the boat.  The process is simple: batter the bung with some varnish, set it into position above the hole, and persuade it into its final resting place with a hammer.


I worked from the starboard stern, forward to the bow cap, and then down the port toe rail, completing the bunging of the rail.  


Tomorrow, I will trim the toe rail bungs and varnish over the fresh teak.  I will also (hopefully, as I am awaiting a delivery) install the taff rail, and also install the business end of the Torqueedo motor.


Total Time Today: 7.5 hrs

Saturday, July 4, 2020

6th (and Final) Coat of Topsides Paint


July 4th, 2020


With enough topsides paint in reserve, I planned yesterday for early coat of paint this morning by lightly sanding the hull yesterday evening.  I awoke early this morning and headed for the shop.  Upon arrival, I gathered the materials (Alexseal paint), and mixed a pot of the two-part paint and then set it to the side to wait for the induction period to expire.

Whilst the paint was doing its chemical thing, I headed to the boat to prepare the hull by first wiping it down with a damp rag, and then followed that with a rag dampened with acetone.  Back to the shop for the painting tools, I quickly commenced with the painting.


Total Time Today 0 hrs

Friday, July 3, 2020

Installing the Coaming Boards and Aft Cockpit Trim


July 3, 2020


First thing on the list for today was to trim the portion of the coaming board/return bungs that were standing proud.  I trimmed the bungs and then carefully sanded down to a fair surface.


With 320-grit paper, I widened my sanding area a bit to help blend in the varnish to come.


With the coaming boards and returns assembled, I took them over to the boat to begin their installation.  I set them on the aft deck while I worked on preparing for their installation.  The first order of business in the prep work was countersinking the fastener holes on the fiberglass molded portion of the coaming.  I wanted to create an area that would trap the bedding compound - helping to keep things water-tight.


I then set up the hydraulic jack and spacer blocks that would help push the coaming boards into their final position.  With everything prepped, I moved to pushing the boards into place.  The hydraulic jack slowly moved the boards tight up against the fiberglass molded coaming.  Once the boards were set in position, I started fastening the 1/4"-20 machine screws.  I worked my way along the boards, 20 screws per board.  With the fasteners in place and the hydraulic jack still supporting things, I began mounting the lock washers and nuts.  Roughly half of the fasteners were accessible through the cockpit lockers, the balance from below.  After installing all fasteners, lock washers and nuts, I removed the hydraulic jack to complete the installation.


Boat is looking good....


Back in the shop, I pulled the aft cockpit trim board and prepared for its installation.  Chances are that the owner will elect to go with a mainsheet traveler installation, and the place for that traveler is aft of the cockpit.  The original/previous install position was on the bridge deck.  I never understood mounting the mainsheet traveler on the bridge deck - encumbering entry and exit to the cabin!  This teak trim board will be a good place to mount a small traveler system, if the owner elects to do that.  Of course a few blocks mounted to the poop deck can accomplish the same goal.


I marked out locations for the fasteners, and drilled bung holes (3/8"), countersinking as I went.


The silicone bronze wood screws to be used.


I secured the trim board, and then bunged the holes with the newly cut 3/8" bungs.


View from aft, as the Allied 24 is being put back together.


Total Time Today: 4.5 hrs

July 29, 2020 The day had arrived!  Time to apply the name of the vessel...S/V Sea Hagg, hailing out of Key Largo (there's on...