Sunday, April 28, 2019

Finishing Mast Step, Strengthening Side Deck, and Applying Primer Guide Coat


April 28, 2019


I had a few hours today to tend to a few things that I had been itching to do for a couple weeks now.  So I carved out the time and, in the parlance of the south, "got'er done!"

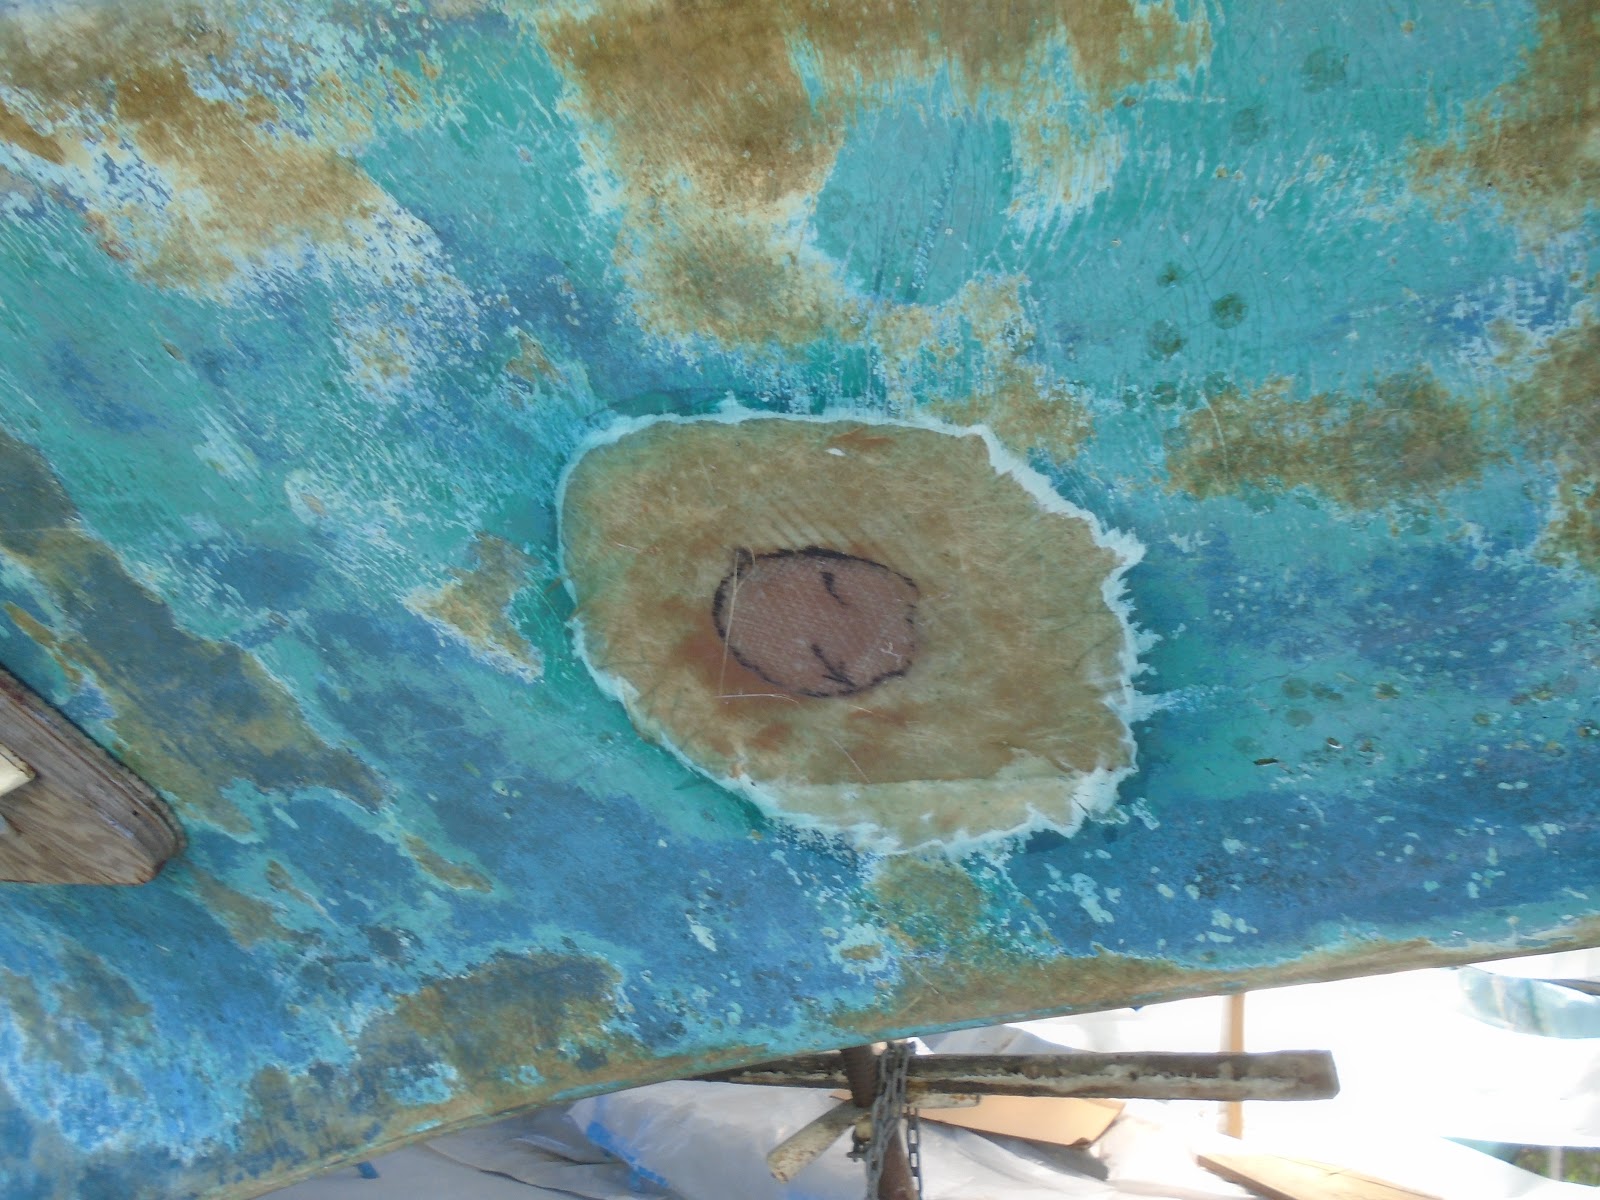
There were concerning voids and cracked fiberglass laminate underneath the starboard side deck, at the transition from the coachroof's aft bulkhead and the cockpit.  I had built up new laminate around this area a couple months ago, but had missed completing the overall rebuild of the bottom skin.  In fact, with a visit from the owner to discuss the ongoing refit, his foot position while traversing from cockpit to foredeck was precisely placed in this area.  There was an audible flex, and I took note.  So, today would be the day.

I made my way over to the boat and solvent-washed the area that I had sanded just a few days prior.  I then took measurements of the areas to be repaired, took those measurements back to the shop, and then cut out a couple panels of 1708 biaxial.


While I had the 1708 biaxial out, I tackled the other project that I had on the day's to-do list.  I cut six 8" x 8" squares of 1708 biaxial to laminate onto the mast step - this would finish off the mast step, with just fairing left prior to primer.


I wet out the areas to be worked today with epoxy resin:  the two locations on the bottom skin of the starboard side deck and the mast step.  I then made my way back to the shop and wet out the side deck panels.  I first applied the new 1708 biaxial cloth to the side deck, and then finished it off with peel ply to cut down on sanding the interior.


I then applied a large panel to the underside of the old ice box that I had previously closed in with new bottom skin - core - and top skin.  I wanted to further tie in this repair to the original bottom skin laminate just forward of where the old ice box access had been located.  In the end I had to scrap the idea of applying peel ply here, as it was becoming increasingly obvious that I was about to make a huge mess.  I will have to water-wash this area and sand it prior to painting.


I returned to the shop to wet out the six 8" x 8" panels for the mast step.


I applied the six panels one at a time, ensuring that no air bubbles remained trapped between laminate layers.  


With the roughly 3/8" to 1/2" base of 1708 biaxial in place, I applied thickened epoxy to fill in the weave up on top and to also ease the transition around the sides of the base.  The thickened epoxy combination that I used was West System's 406 colloidal silica and 403 microfibers - having excellent gap-filling and bonding strength.


Finally, I further faired and eased the transitions around the mast step with a combination of 406 colloidal silica and 407 low-density fairing filler.


While  I was at the fairing task, I decided to mix another couple batches of the 406 and 407 combination, and fair out the entirety of the coachroof repair.  I had replaced the core material as it was suffering from water ingress and loss of structural integrity.  The mast step, over time and due to the wet core, had transformed into what I liked to refer to as the tank turret - a ~50 lb. hunk of stainless steel that, together with a steel supports below, was doing a not so great job of holding the mast in place.

I spread the fairing compound on with a large dry-wall knife in order to bridge a number of dips and valleys.  There will be more fairing and sanding to come here prior to paint.


Speaking of paint!  I had moved enough along on the balance of the boat that I was ready to get a "guide coat" of primer on.  Truth be told, I had a few reasons to get primer on some portions of the boat:  1. I really needed to get paint on to protect the cured epoxy resin from harmful UV damage, 2. I needed to help reveal small pinholes and voids that I was inevitably missing, 3. the application of primer would be a great first "guide coat" which would allow me to see areas that required a bit more fairing compound, and 4. I had some leftover Alex Seal 422 primer sitting around.

I mixed up the primer and converter in a 1:1 ratio, and stayed busy through the induction period by wiping down the surfaces to remove any dust or other contaminates prior to the paint application.  With the induction period over, I began rolling the paint on the aft deck.


I then worked my way froward through the cockpit and side decks - note that not all surfaces with in the cockpit were primed since some areas had obvious need for further fairing work.


I primed the bulkhead and coachroof around the companionway next.


Finally, I finished along the starboard side deck and cabin sides.  It was actually really nice to see the ugly fairing scars covered up with a monotone color applied.  My focus from here on out will be to get the balance of the fairing work finished, then sand and come back with a build primer to help further fill in the smallest of surface imperfections.  A finish primer will follow the build primer, and just prior to the topcoat paint application.


Total Time Today: 3.5 hrs

Saturday, April 27, 2019

Glassing in Old Thru-Hulls and Cockpit Well Drains


April 27, 2019


The aim today was to get the old thru-hulls closed in, as well as the cockpit drain holes that I had recently opened up by removing the scupper fittings.

I began by templating the layers of fiberglass that I would need in order to close in the various holes.


I laid out a sheet of plastic over the area to be repaired, marked the location, and then traced a pattern to be cut from the 1708 biaxial cloth I had back in the shop.  I marked the orientation of the layers of glass in order to ensure they would be applied as originally laid out.


I made my way around the boat, marking the four thru-hulls that would need to be closed in with laminations.


In a previous work session, I had ground tapers in the location of the old thru-hulls and followed the 12:1 taper rule radius of new fiberglass to width of existing laminate.


I then moved to the interior of the boat and marked for the laminate patches to be placed here, and started with the cockpit thru-hulls.


The port side was a solid laminate up through to the surface of the molded liner, while the starboard side contained a depression that would require more layers of glass to fill in.


I then moved up into the cockpit to create laminating patterns for the location of the recently removed drain fittings.  


We will be starting over in this area as well, with materials ordered in in transit.


I then moved forward in the interior of the boat, and created patterns for the location of the previously removed seacocks for the head.  The thru-hull fittings had been capped by a previous owner, so it was time to rid the boat of these. 


The new owner has elected not to reinstall a head with water intake and discharge, but rather go with a portable version since the boat would be used as a weekender / coastal cruiser.  These holes, along with the interior liner, will be completely glassed.


With all of my patterns created, I returned to the shop and cut the various layers of 1708 biaxial, making sure to keep things organized.


I began at the forward starboard thru-hull, and wet the surface out with resin.  I then proceeded to laminate the new 1708 biaxial cloth in place, bringing the surface up to relatively fairness with the surrounding liner.


I repeated the process on the port side, and then laid a layer of peel ply on top of the laminations.


I then moved back to the location of the cockpit well thru-hulls, and glassed those in.  I also sealed the surface with peel ply.


I moved up onto the cockpit well itself, and repeated the steps to glass in these holes.  I did apply a skim coat of thickened epoxy on each of these in addition.


Back outside, I moved around from old thru-hull location to location, and applied the laminating schedule to complete these repairs.  I began with the aft port thru-hull.  I wet the surface with resin and then apply a small amount of thickened epoxy to fill in the void between the interior fiberglass and the exterior surface of the hull.


I will no doubt need to come back and apply skim coats of thickened epoxy to bring the surfaces to fair.


I also applied the peel ply to these repairs, which will greatly reduce the need for sanding.


The forward starboard side of the boat was neglected for a few minutes, just enough time for things to begin kicking and preventing me from applying the final two layers of 1708 biaxial cloth.  Further laminating will have to wait until this repair cures and I can water-wash then sand it to prep for further laminations.  Happy with the progress, and much closer to paint!


Total Time Today: 4 hrs

Friday, April 26, 2019

Sanding, Sanding, Sanding


April 26, 2019


A grueling day of sanding!  I managed to get most of the detail work done today, requiring hand sanding in tight radius curves; I also managed to progress through the 5" DA random orbital, 6" DA random orbital, the 1" wide belt sander, and of course the finely tuned fingers for hand sanding.  I covered essentially the length of the boat, sanding areas that the tools could not get to, and then repeated my efforts with the tools fit for the particular surface being worked.

I also managed to get back on the ground, and continued prep work on the sail drive mounting surface.  I ground a taper around the depression forward of the old engine well to eventually accept a layer or two of 1708 biaxial cloth.


Most of the structure (G-10 board), with broad lengths of 1708 biaxial to spread the loads that the engine will place on the boat's hull while in service, will be built up on the interior surface within the existing lazarette.  The old engine well will be glassed in as well, further saving to spread loads across the interior surfaces.  

Not much today in the way of interesting photos, or descriptions, but an essential day!


Total Time Today: 5 hrs

Thursday, April 25, 2019

Start of Sail Drive Installation


April 25, 2019

I was anxious to get started on the sail drive installation, needing to make hull modifications ahead of the painting process both exterior and interior.  The fiberglass work is coming along well across the entirety of the boat, and with the exception of the collision/chain locker  bulkhead, the sail drive modification was the last remaining chore.  The owner elected to "go green" with the selection of the Torqeedo Cruise 4.0 pod drive.  Equivalent to an 8hp outboard gasoline engine, the Cruise 4.0 has a running time (range) of nearly 10 hours at 2.7 knots and over an hour at 6 knots.  Perfect for getting the Allied on and off the dock or mooring ball!

I started by checking that the boat was level from side to side, sitting on her keel.  My intention was to build a jig , and secure it to her counter, or overhang, and then use a router to create a depression to accept the mounting plate of the Cruise 4.0 pod drive.


Next, I worked to remove the lazarette thru-hull installed to allow any water that lapped up into the outboard well to then drain out. 


I removed the mushroom head with an angle grinder and then used a specialized step wrench to remove the threaded fitting.


Back in the shop, and using the Cruise 4.0 mounting plate, I created a template that would be used as a jig for the installation.  I used the template to drill fastener holes, and then tapped those holes for 1/4" threaded bolts.


With the bolt holes drilled and tapped, I installed the template and reviewed the mount angle for further adjustments.


I wanted to avoid a perfectly horizontal mount, or in a parallel plane as the water line.  Rather, I wanted a slightly tilted angle, with the forward end angled higher than the aft end of the template - and ultimately the mounting plate.  With the template / jig in place I began to reconsider my plans for creating the depression within the overhang that the pod drive mounting plate would rest.  There was simply no good way for me to work with the jig as it was.  So, I modified it in order to preserve the dimensions as it hung in place.  I hot-glued a couple blocks of wood to either side the centerline, and then hot-glued a couple strips of doorskin (thin, cheap plywood) to those blocks of wood and such that they were just touching the hull's overhang.


The photo below shows the two strips of doorskin (vertical orientation) with two 1"x4" blocks in line, with bevels cut to mirror the angle of the hull's overhang.


I then cut the 1"x4" blocks down to roughly 3/4 of an inch on the aft ends and narrowing down to 3/8 of an inch on the forward ends.  My altered approach would be to hot-glue these shallow blocks to the hull's overhang, using them as a router sled to then remove material from the hull's laminate.  Setting the router deep enough to remove more material forward, and as I slide the router aft, the increasing height of the sleds would then prevent less and less material from being removed.  The effect, when complete, would present a mounting angle, compared to the water line plane, that would angle down moving from forward to aft.


I checked the dimension of the space I was about to route out (between the two sleds' inside edges.  The Cruise 4.0 mounting plate (shown above and below) would rest within this space.  Satisfied with the dimensions and plan of attack, I moved back over to the boat.


I first replicated the dimensions of the area to route out, and marked them onto the hull.  From the previously marked centerline, I made parallel lines 2" to starboard and 2" to port from that centerline.  The depression that the mounting plate would be nestled within would begin by being a 4" wide and roughly 8.5" long depression.


The angles of the sleds produced fine results for the initial cuts.  There would be some further clean up and fine-tuning, but for the first scratch at it, I couldn't have been more satisfied.


I will build up the aft end slightly to further produce the angle of attack that I am going for - sloping down going from forward to aft.  More to come.


Total Time Today:  3 hrs  -  it was an 7.5 hr day, but there was a lot of head scratching and trialing  :)

Wednesday, April 24, 2019

Sanding, Glassing, and Thru-hull Removal and Prep


April 24, 2019

With a few days of vacation to burn, I resumed work on the Allied 24 today.  I'm making great progress on the exterior surfaces, but with a number of "issues" (aka chips, cracks and voids in the gelcoat), the fairing-sanding-fairing process has a time multiplier across the entirety of the boat.  Nevertheless, I am ticking them off a few at a time.

I started today with a water-wash of the previous session's epoxy work, a perfunctory task following any epoxy work in order to remove the amine blush (waxy surface) that forms on the curing resin.  I began at the lazarette hatch frame, and with the 5" ROB and hand-sanding I shaped the repaired surfaces to bring them into fair with the surrounding surfaces.    


I moved forward through the cockpit, sanding the previously filled areas.  I would come back after completing the entirety of the sanding to apply the next round of fairing compound...an iterative process to bring things up to, well, fair.


I repeated the process on the forward hatch frame.  I reapplied fairing compound to the recently sanded surfaces, and then applied 1708 biaxial cloth to the aft portion of the hatch frame to close in a notch that was cut into it.


I also applied 10oz cloth to a repair area in the cockpit well - vertical surface on the starboard side.


I then followed the application of fiberglass cloth with a skim coat of fairing compound.


I then moved up onto the coach roof, and I applied a couple layers of 1708 biaxial cloth to the mast step.  I then applied a skim coat of fairing compound, but afterward I realized that I would need at least one more layer of 1708.


With the sanding and resin work done for today, I turned to more analog tasks: the cockpit well scuppers and their thru-hulls.  I first began with removing the cockpit well scuppers.


I then removed the thru-hulls.  I did this by using the 4" angle grinder and cut-off wheel to essentially destroy the mushroom fitting, and then pulled the balance of the fitting through the open hole from the interior of the boat.


I then used the angle grinder and a 40-grit flap wheel disc to grind tapers around the top surface of where the cockpit well scuppers once resided.  I will be closing these open holes in completely and then relocating new drains.


I repeated the process on the starboard side as well.


While I had the angle grinder out, I ground the typical 12:1 taper in the hull as prep for the eventual glassing in of these open holes.  The 12:1 taper is 12 x the thickness of the hull's laminate.  The hull is 3/8 at the turn of the bilge, and so therefore the widest layer of 1708 biaxial would have a 4.5" radius.  


I repeated the process on the port side.  The existing thru-hulls are simply the mushroom fittings with a backing but securing it.  If there happen to be a failure of the hose from the cockpit well to the mushroom fitting, the boat would sink.  So, proper seacocks are called for and will be slightly relocated.


Total Time Today: 5 hrs

July 29, 2020 The day had arrived!  Time to apply the name of the vessel...S/V Sea Hagg, hailing out of Key Largo (there's on...