Saturday, January 26, 2019

Sanding the Decks (Part 1)


January 26, 2019


Back from an epic sail in the Caribbean, and taking a short break from the hospital (enjoying the new addition to our family), I got a couple hours on the Allied 24 today.  With temperatures a bit too chilly to layup the top skin on the coach roof, I decided to begin removing the old topcoat from the decks.  The topcoat application was done poorly, as has most repairs on this classic little yacht, so getting done to the new paint prep layer is extremely satisfying.  

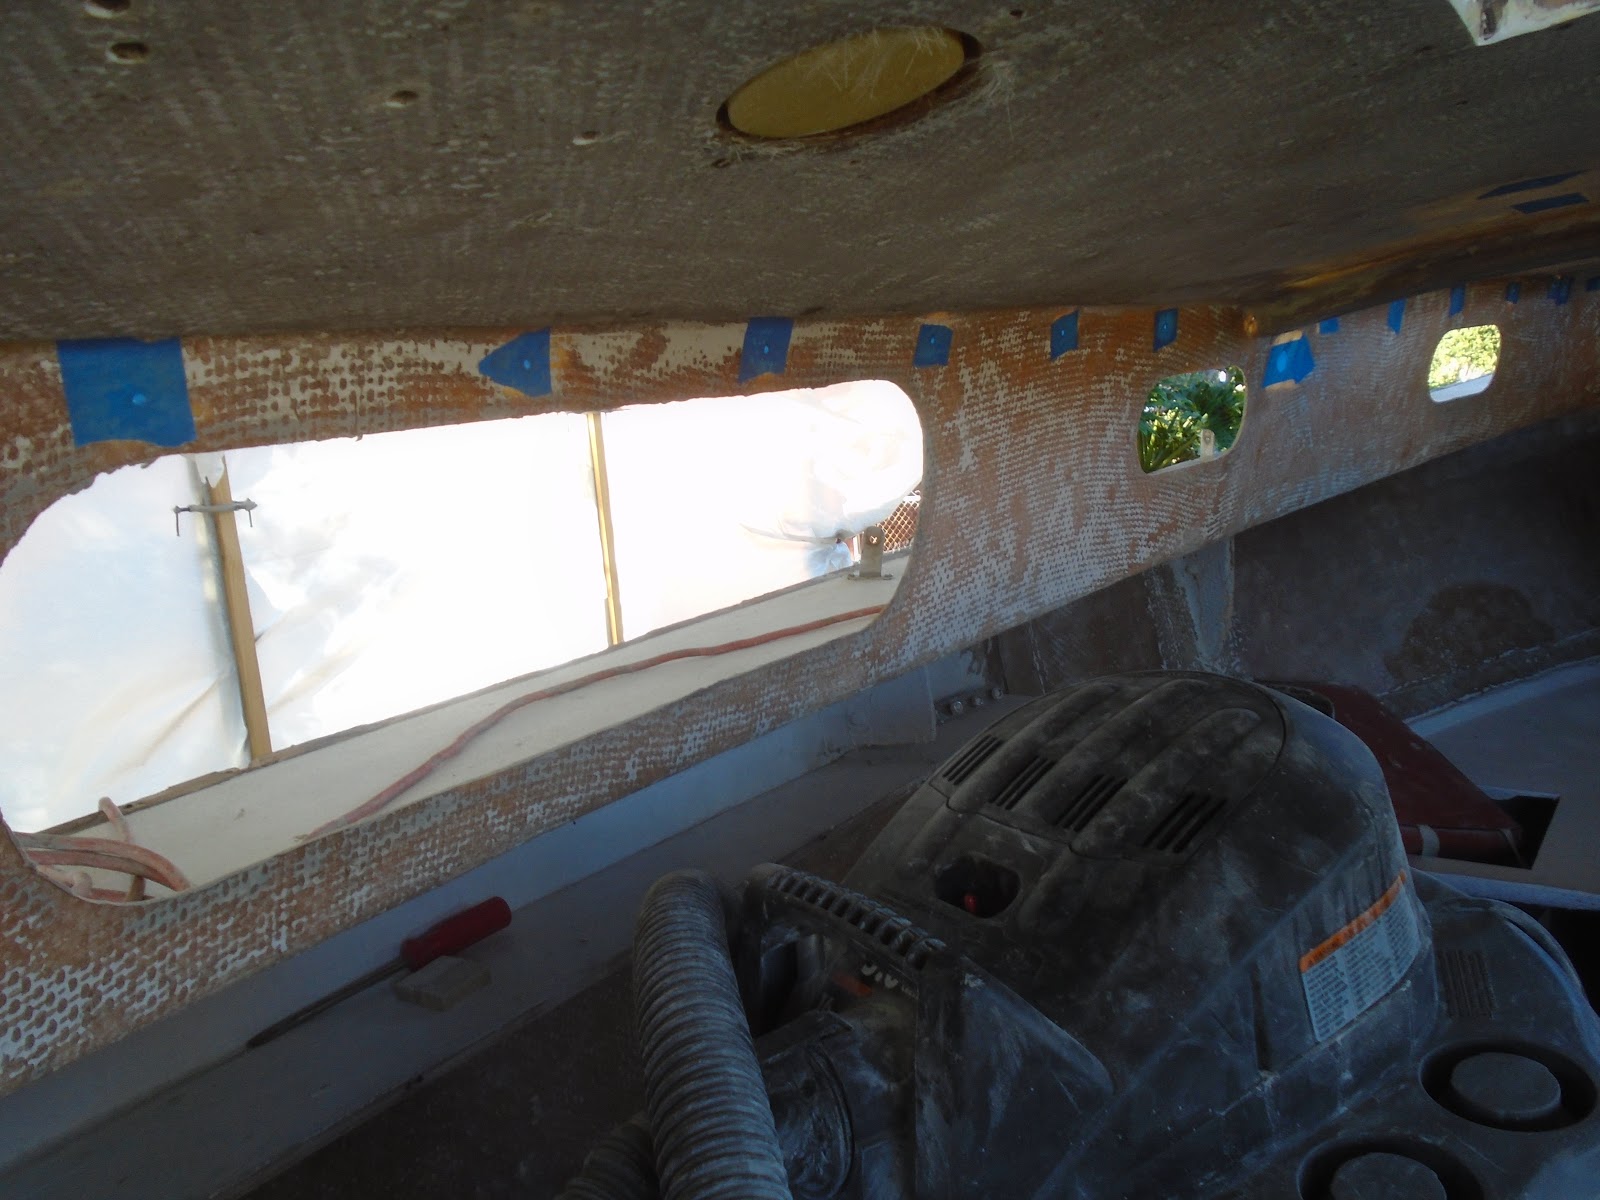
I used the a 6" random orbital sander with a dust vac. system, applying 60-grit discs for the paint removal.  I began with the poop deck and worked my way forward.  Since I only had  a couple hours until I needed to get back to the family, I narrowed my focus to the horizontal surfaces on the aft portion of the boat.  The key to the removal was changing discs with regular frequency; delaying the change meant slowing the progress, as the paint and filler would inevitably clog it.  Previous repair work revealed itself as I went along, and these areas would be looked at closely to ensure they are ready fairing and new paint. 


With the poop deck complete, I moved onto the starboard side deck and worked forward.  As I finished the starboard side deck, I switched to the aft portion of the port side deck and again worked forward.  I stopped at the aft end of the raised cabin - the aft bulkhead of the cabin top, or coach roof. The side decks complete, I then moved onto the bridge deck and seats within the cockpit well.  


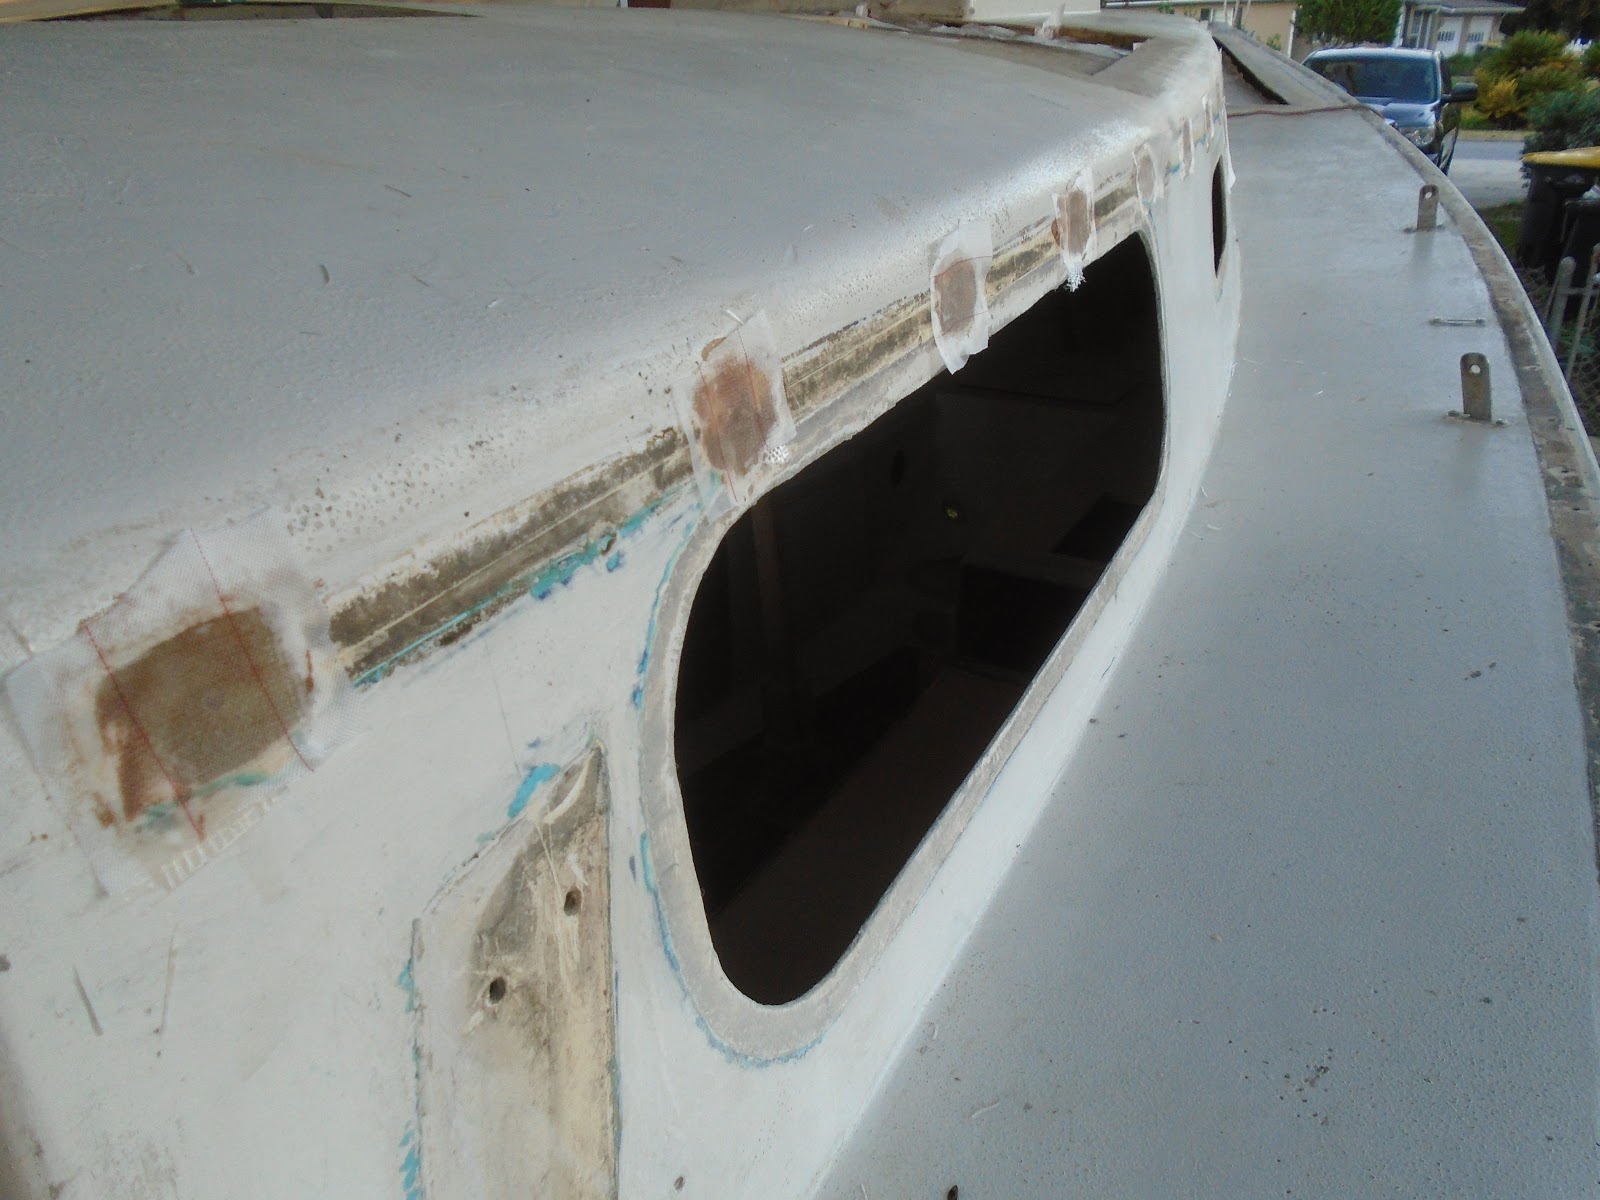
The final portion of sanding today would be the coach roof itself, just up to the tape line protecting the new core.  Again in this area, previous repairs revealed themselves. Additional fill work is required in the cockpit as well as sanding the vertical surfaces, but making great progress.


Total Time Today: 2.25 hrs

Sunday, January 13, 2019

Coach Roof Core Installation


January 13, 2019


In the previous work session I managed to prepare the surfaces of the coach roof for the new core, as well as prepare the materials for the installation: core and two layers of 1708 biaxial cloth.  Today, I resumed the work on the coach roof by first test-fitting the core material.  I had a minor bit of trimming to do on the large aft section, to port.  With those minor modifications, the core material slipped into position beautifully.  I had some irregular bottom skin surface to either side of the new mast step, so I solved this issue by using a thinner piece of Divinycell foam core in these areas.  I will also apply thickened epoxy to bring these slightly lower areas to fair with the surrounding surfaces. 

I carefully removed the core and set the pieces to the side.  Next, I mixed thickened epoxy by combining 406 colloidal silica and 407 low-density filler to form a good gap filling consistency, and spread it into the voids beneath the existing top skin around the perimeter of the opened coach roof.


Back in the shop, I mixed a couple large batches of thickened epoxy, again using 406 & 407, and with a notched trowel spread it onto the bottom skin.  I carefully placed the large portion of core material onto the bed of thickened epoxy.  I worked the core into the thickened epoxy, applying even pressure across the coach roof, and supported by the braces I installed previously.  With a squeegee, I cleaned up the epoxy squeeze out, ensuring it filled the small gaps around the perimeter of the work area.  I placed the sand bags (weights) onto the newly installed core as I progressed. 


I finished with the two smaller areas to either side of the centerline, and again placed the weighted sand bags.  There is yet more work to do at the integral mast support beam, and will have to wait for the next session.  Also, the two layers of 1708 cloth will be installed after the core cures in place.


Total Time Today: 2.5 hrs

Saturday, January 12, 2019

Prepping for Coach Roof Core Installation


January 12, 2019


I was excited to get back on the Allied 24 today, and did just that after running some errands in the morning.  My first order or business was to further prepare the coach roof for new core material and top skin installation.  I removed additional top skin and core to the aft of the existing open area, allowing for an easier, and I believe stronger, installation of the new material.  After removal of a couple ~6" x 8" areas, one to port and one to starboard of centerline, I sanded a proper taper on the adjacent existing top skin to allow the new top skin cloth to tie into it.  I thoroughly vacuumed the surfaces and wiped them down with a solvent to prep for epoxy work.


My next order of business was to protect the coach roof camber - the convex surface - as I weight down the new core material during installation and through its curing time.  I plan to bed the new balsa core material in a bed of thickened epoxy, and will then place weights across the installation to ensure that no voids result.  I took a piece of 1" x 1/2" white oak from my shop and cut kerfs perpendicular to and along its length.  The kerfs, or shallow cuts, would allow the piece to bend to the  coach roof camber.  This kerfed piece of white oak would be the temporary support beam, along with bracing, allowing me to weight down the new core and also protecting and even improving the shape of the coach roof.


I used some additional scrap material and braced the coach roof from within the cabin.


Back on top of the deck, I laid out a few pieces of plastic sheeting to template the layers of 1708 biaxial cloth (new top skin) and the balsa core material.


I brought the templates to the shop and laid them out for material removal.  I began with the larger aft template.  I laid out the larger, outer layer of 1708 biaxial, and traced around the pattern.


With a pair of sharp scissors (slowly dulling by cutting this thick glass), I cut out the larger layer of the top skin.


Next, I cut down the pattern, or template, for the smaller, inner layer.


I traced around the smaller, inner layer of top skin, and then cut it out.


Finally, I used the same template for the smaller, inner layer of top skin, and applied it to the fresh balsa core material.  I traced around the pattern, transferring it to the balsa.


With a sharp razor blade I then removed the new balsa core, the aft section, from a new sheet of balsa material.  I now had two layers of 1708 biaxial cloth and a layer of balsa core removed for the aft portion of the coach roof repair.  There are three primary sections for the installation of core and top skin on the coach roof: large aft section, and two smaller sections forward to port and forward to starboard.  


As I did for the larger aft section, I repeated the process of removing first the outer layer of cloth and then the inner layer, and finished with the balsa core material.  The section below will be to port, forward of the larger repair area.


I also prepared the starboard portion, again forward of the larger repair area.  Two layers of 1708 biaxial and one layer of balsa core.


I cleaned up the shop and laid out the material comprising the three sections of coach roof core and top skin repair. 


Prior to closing the shop for the evening, I transferred sand to several one gallon storage bags.  These bags will be used as weights that I can move around the coach roof and which will weight down the new core installation.  The plastic will not stick to any errant epoxy, and the sand will allow conformity to the deck surface.  All prepped.


Total Time Today: 4.75 hrs

Sunday, January 6, 2019

Filling Fastener Holes (Coachroof)


January 6, 2019


Continuing to close in the top skin of unnecessary holes, I tackled the coachroof today.  I began by cleaning both sides of the openings with solvent, and then securing a bit of tape to the backside in order to prevent squeeze out of epoxy resin during the fill process.


I made my way around the interior, from starboard to port and including the overhead, applying the tape.


My next step was to wet out the outside surfaces, which simply is painting on epoxy resin without any thickeners added to it.  This process is to ensure I have good adhesion, a good chemical bond, throughout the work surfaces.


I then applied a thin film of epoxy resin, but this time thickened with a combination of West System's 406 colloidal silica and 407 low-density filler.  I made sure to work the thickened epoxy into the cavity while also ensuring a thin smoothing layer across the surface.


With that finished, I then cut small patches of 6oz fiberglass cloth, and applied them to each of the prepared work areas.  I pressed them in by hand, with gentle pressure, and then ensured that the weave in each of the patches was fully wet out, using a foam brush.


My final step was to apply a bit of peel ply, or release fabric, to each of the filled areas.  This release fabric would prevent amine blush (a wax that forms of cured epoxy surfaces), and would also leave a textured surface ready for further laminating or fill work without having to clean and sand.  This application of release fabric is a great time saver for me.


The work areas on the coachroof were the cabin sides, where the old eyebrow trim board was installed, working my way from starboard to forward and then back along the port side...


...as well as the coachroof itself, and finally the cabin's aft bulkhead.


Next step will be to pull the release fabric off, prep any areas that I suspect may have had amine blush from on the surface and then sand to create a textured surface that would promote a good mechanical resin bond, and then fill and fair the holes.  General sanding off the deck will follow as well, but will come after I have filled the openings requiring closure. 


Total Time Today: 2.5 hrs

Tuesday, January 1, 2019

Rebuilding the Mast Step (Part 3)


January 1, 2019


Well, Happy New Year, dear reader!  And what a day to be working outside on a classic sailboat!

I went straight into the continuation of the mast step / mast support beam rebuild by water-washing the amine blush from the cured surfaces, drying, and then sanding the work area to prep for further lamination.  The task today was to layout a layer of 1708 glass across the integral support beam, and to assemble the mast step itself, comprised of layers of G-10 fiberglass board.


I sanded the opening on the coach roof to my satisfaction, and then thoroughly vacuumed and solvent-wiped the surfaces in preparation for further lamination.


With existing G-10 board that I had in my inventory, as well as a board purchased specifically for this project, I laid out, measured, cut, and prepped the various boards for construction of the mast step.


The basic assembly of the G-10 boards for the mast step is pictured below.  I narrow piece would serve to fill the recessed opening in the integral mast support beam, two slightly wider pieces would bridge the remaining recess and back to the aft edge of the forward hatch frame, and lastly, a larger piece would cover the sub-assembly serving to tie it all together.  I would fill any gaps with thickened epoxy, creating a solid foundation for the mast step.  Below this new assembly of G-10 boards, as readers will note from earlier work, I had encapsulated additional G-10 boards.  The mast step will essentially be a solid foundation of fiberglass and epoxy resin - firm foundation for the mast.


Prior to wetting out the work area, I applied some 4" wide 1708 biaxial tabbing material, and marked it for a cut line so that the glass would lay flat in the recessed opening.


After I cut the initial layer of 1708 cloth, I wet the recessed opening with neat epoxy (epoxy resin without any thickeners).  I then made my way back to the shop and wet out the 1708 biaxial itself.  With the remaining epoxy resin in the mixing cup, I added 406 colloidal silica and 407 low-density filler to create a thickened epoxy.  Using a squeegee, I applied a very thin layer of this thickened epoxy across the already wet surfaces in order to fill any small voids in the surface.  With this done, I applied the 1708 biaxial layer, and applied a layer of peel ply, or release fabric, to the outboard sections.  These sections would see no further work for the day, so I carefully applied this material to exclude the center portion of the mast support beam in order to continue to construct the new mast step.  The peel ply / release fabric creates a surface free of amine blush and textured so that one can continue laminating without the need to first water-wash  and sand the surface.


I moved forward with the final task which was to assemble the mast step.  I applied a layer of thickened epoxy to the bottom surface, again using a combination of the 406 and 407 thickeners.  I pressed the first G-10 piece in place, ensuring all gaps were filled in with the thickened epoxy.  Next, I spread a layer of thickened epoxy on the top of the first piece of G-10 and then placed the next two G-10 pieces in place comprising the second layer.  Continuing the sandwiching making process, I buttered the tops of the second layer of G-10 pieces, and then set the third and final larger piece of G-10 in place.  I worked my way around the assembly to ensure all gaps were filled and that no unnecessary thickened epoxy remained on the surface that would require sanding work to remove.


Finally, I covered the assembly with additional layers of release fabric in order to minimize the subsequent prep work for additional lamination.  I'm making good progress on closing in the coach roof and other deck areas.  With some additional laminating work on the mast support beam, I will be ready to replace the core on the coach roof.  


Total Time Today: 3.25 hrs

July 29, 2020 The day had arrived!  Time to apply the name of the vessel...S/V Sea Hagg, hailing out of Key Largo (there's on...