Monday, December 31, 2018

Rebuilding the Mast Step (Part 2)


December 31, 2018


I'm currently working to close up the open areas of the deck / coach roof, and today I brought the work closer to that end by focusing on the mast step / mast support beam.  The integral support beam (a glassed-in beam as seen from within the cabin) runs athwart ship, or perpendicular to the length of the Allied 24.  In previous work, I laminated a new center portion of the support beam with 1708 biaxial cloth, a piece of 3/8" G-10, bedded in thickened epoxy.  Today, I wanted to focus on the portions of the mast support beam to the port and starboard side of the center section / mast step.

I began by transferring the camber of the deck onto a piece of cardboard; I accomplished this by using a small compass, following the overhead curvature.  The purpose of this was to create a template to then apply to a piece of mahogany; the mahogany hardwood would serve as a filler for the rather large opening in the deck.  Along with thickened epoxy and biaxial cloth, the mahogany would provide structural support to this critical area of the deck.


Back in the shop, I applied the templates and shaped the mahogany to fit the port and starboard sides of the mast support beam.


My next step would be to wet the mahogany out with West System epoxy resin without thickening agents, otherwise known as "neat epoxy".  I set them to the side and focused on the prepping the cavities...


I mixed a few batches of thickened epoxy, made my way over to the boat, and pushed this thickened mixture into the opening of the mast support beam.  I focused on the outboard edges of the opening at first, and then applied a bed of the thickened epoxy to the bottom of the opening.  I made my way back to the shop and mixed another batch of thickened epoxy, grabbed the mahogany filler pieces and headed back to the boat.  I placed the mahogany structural pieces into the previously applied epoxy, firmly pushing and bedding them into place.  I then applied additional thickened epoxy to fill the gaps surrounding the mahogany.  This would be the extent of the work today, and I finished it off with laying out some peel ply fabric.  Tomorrow will be fine tuning the day's work, and finishing off the support structure with a layer of 1708 biaxial cloth.  I may get to installing the new G-10 mast step core material, depending on time available (post new year's eve celebration and all).


Total Time Today: 2.75 hrs

Sunday, December 30, 2018

Fairing (Sanding) the Cabin Overhead (Part 2)


December 30, 2018


I spent a few hours this Sunday afternoon getting the mast support beam nearer to reconstruction, as well as the continuation of interior surface prep for eventual paint application.  I began by water-washing the previous work (the interior filleting to smooth vertical and horizontal transitions, filling voids in the laminate, and the 6oz cloth I wrapped the mast support beam with to prep for more substantial repairs), this process was to remove the amine blush (wax) that formed on the surface of the epoxy as it cured.  Not removing this wax from the surface could contaminate it and impede further work.  I had applied peel ply to the center of the mast support beam, the location of the future mast step, and so I did not need to remove amine blush from this area. 


I dried the surfaces well, and proceeded to sand the areas requiring it with 80-grit paper, with the random orbital sander and by hand where I had to.  The mast support beam was essentially ready for construction, or reconstruction.  I will be glassing in two internal support/stiffener beams, either side of the mast support, and then tying the entire beam together with fiberglass both up on deck and down below.  The primary bulkheads will be fitted to the hull sides as well as the overhead (beneath) the mast support beam), and tabbed to the overhead and hull to help distribute the weight of the mast.


I cleaned up the work area up on the coach roof by vacuuming, and then turned my attention to down below.


A few weeks ago, I applied thickened epoxy to areas of the cabin overhead requiring it, from the mast support beam up to the foredeck repair area.  Now, having water-washed the surfaces, I could begin to sand and fair out those areas.  I removed the temporary brace in order to sand the center portion of the mast support beam, and then replaced it.


I worked my way outboard to port first,


and then to starboard.  I worked the areas with the random orbital sander, the oscillating tool in the tightest of areas, and also by hand.


The interior repair of the mast support beam will include laminating a width of 1708 biaxial cloth the entire width of the beam, prior to setting the new 3/4" primary bulkheads in place.


As mentioned previously, the primary bulkheads will be tabbed to the overhead and hull sides to further distribute the mast load.


I then worked my way forward, port and starboard, sanding the areas that I had applied the thickened epoxy.  This surface prep will serve to promote a cleaner finish paint appearance.


Total Time Today: 3.5 hrs

Saturday, December 29, 2018

Foredeck Repair (Part 1)


December 29, 2018


At some point along the history of this Allied Greenwich 24, the foredeck core suffered damage from water intrusion.  It was likely a fastener, or variant of a deck penetration, not properly sealed which then allowed water to find its way into the core material; over time, the balsa core began to delaminate and flex under foot.  The most recent repair to the damaged area of the foredeck was to remove the top and bottom skin, along with the core material, and to secure a panel of plywood below and glass over the top.  Again, at some point, the inadequate repair allowed water to migrate in and damaged the plywood...more flex and delamination occurred.

The Allied 24's new owner has decided to have the foredeck repaired in such a way as to hold up to the rigor he will put her through. In addition, any fasteners or deck penetrations will be done in such a way to prevent water from getting to the new balsa core.

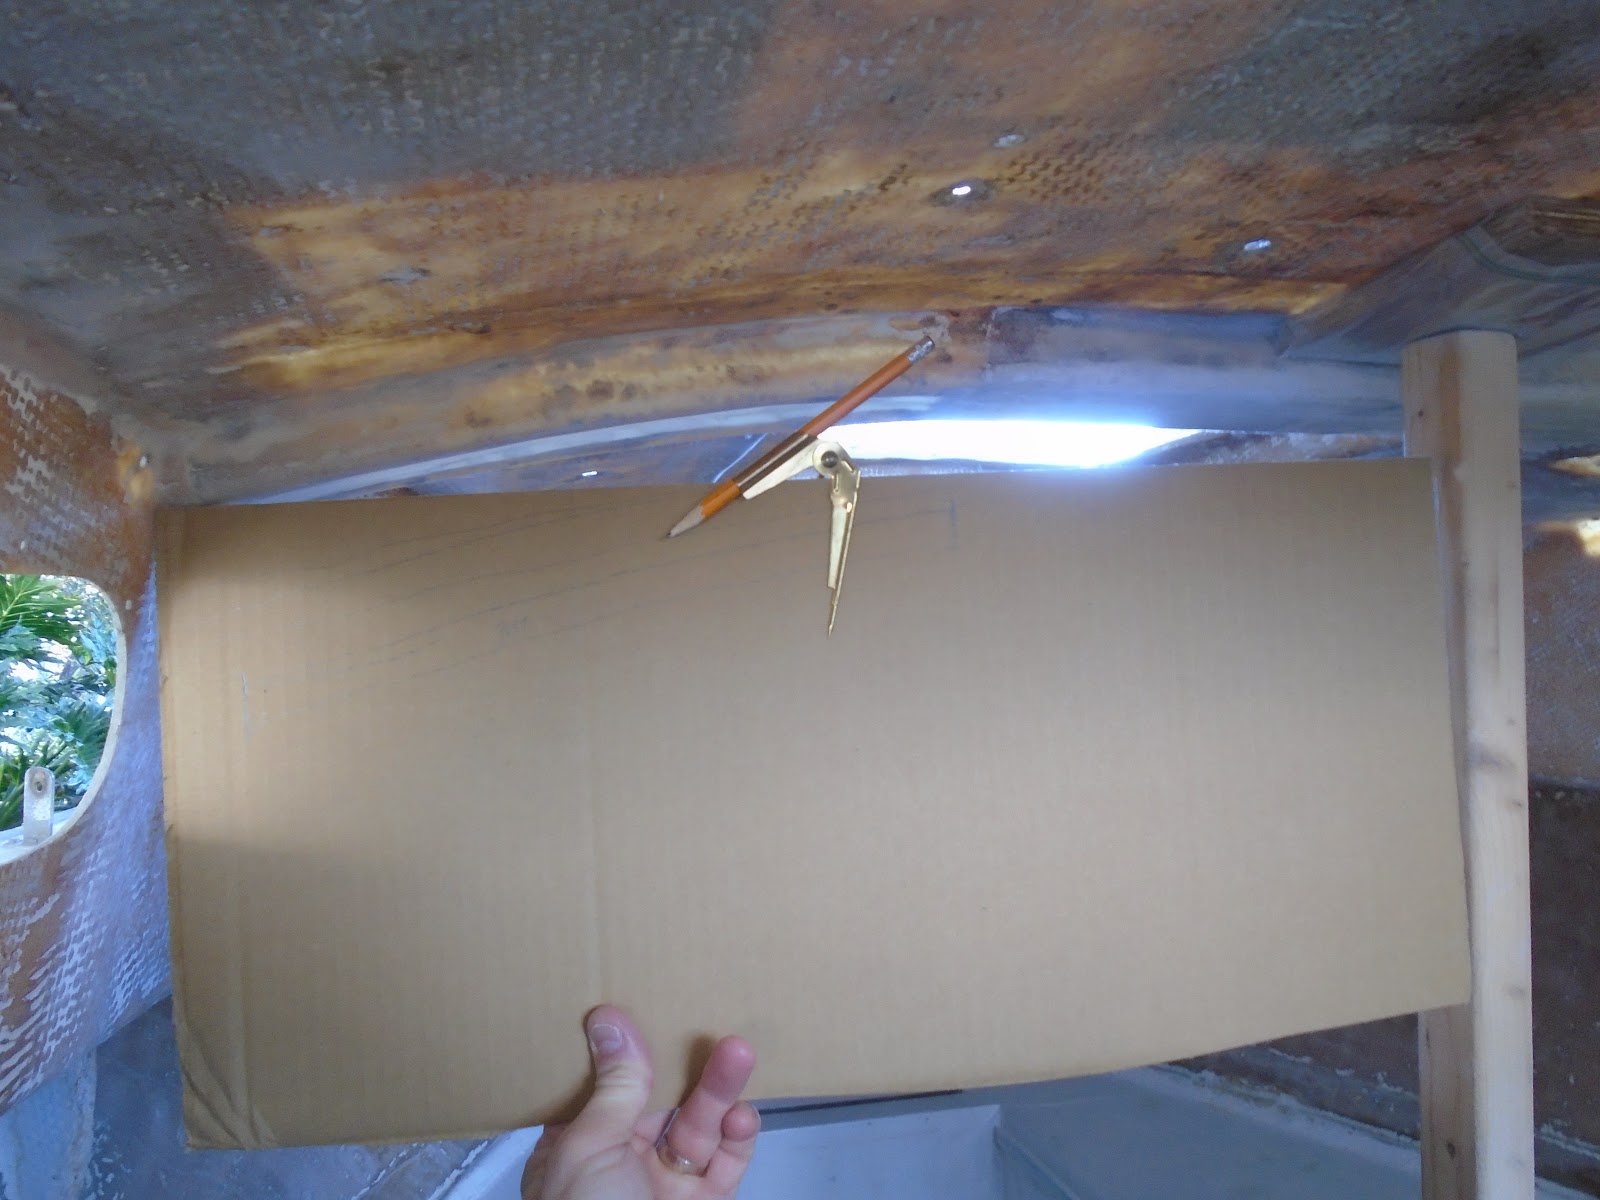
I broke out one of those clever boat restoration tools...the hot glue gun!  Yep, this tool is highly useful in templating just about anything, serving as a third or fourth (or ninth) hand while tackling just about anything, etc.   


I used it to build a template for a temporary base, to be cut from door skin material, which would allow me to begin to laminate in the new bottom skin.  I had a few thin strips of old teak laying around the shop that would serve the task of templating nicely.  I worked my around the perimeter of where the core material would be installed - leaving a slight gap between the edge where the new core would be installed and the existing top skin to be tabbed onto. 


I gently pried the template from the overhead, or bottom skin, and set it onto a piece of door skin I had purchased from a big box retailer.  I then transferred the shape of the template to the door skin.


Using a jigsaw, I removed the template from the door skin panel.  This template would serve only to support the new bottom skin installation and through its curing time.  


At the peak of the foredeck, the top skin overhung to an extent that I wanted to go ahead and apply a section of new core material just prior to installing the first layer of bottom skin.  Using a small piece of plastic sheeting, I traced the truncated pyramid shape and used it as a template to remove the shape from a couple leftover pieces of balsa core.


I wet out the underside of the top skin (on the boat) with neat epoxy - epoxy resin without any thickener added to it.  I then came back to the shop to wet out the balsa core itself, and to apply a bit of thickened epoxy to the surface of the balsa core that would come into contact with the underside of the top skin.  


With the balsa core sorted out, I pressed it into a predetermined position, making sure that the thickened epoxy mixture pulled it firmly and securely into its final position.  I could now begin the first layer of bottom skin installation.


Back in the shop, I applied a combination of plastic sheeting and clear packaging tape to the surface of the door skin template.  This surface prep would ensure that the door skin would not become a permanent fixture within the boat. 


I also transferred the door skin shape to a sheet of 1708 biaxial cloth, and removed the first layer of bottom skin.


I cut out enough peel ply / release fabric to cover the door skin / surface of the first layer of bottom skin.  Having the peel play in place would allow me to continue the laminating process without having to wash the amine blush and sand the surface for an adequate mechanical bond.  
I made my way back over to the Allied 24 to install mounting blocks with the hot glue gun.  This is where the "ninth" hand comes in.  I used the hot glue gun to mount a series of blocks both on the bottom skin within the boat and on the door skin.  I set aside the same number of wood strips to serve as the bridge from block on the bottom skin to block on the door skin - thusly securing the temporary base / door skin in place.


What took place next, I simply could not photograph!  There was a significant amount of resin that I had to mix and apply to a rather large piece of 1708 biaxial.  There are folks that work with 6oz cloth and then there are folks that work with, well, more robust pieces of fiberglass.  I fell into the later bucket today.  It was game on from the start, and thus I did not have the luxury of time to stop and memorialize the process.
I wet out the large sheet of 1708, and then applied the peel ply / release fabric to the top of the glass.  I then inverted both the peel ply and 1708 lamination onto the door skin.  Since there was a slight "dip" in the bottom skin I would be laminating onto, I decided to apply two additional layers of 1708 to either side of the "dip".  This would ensure that I had a consistent lamination athwart ship, without voids.  


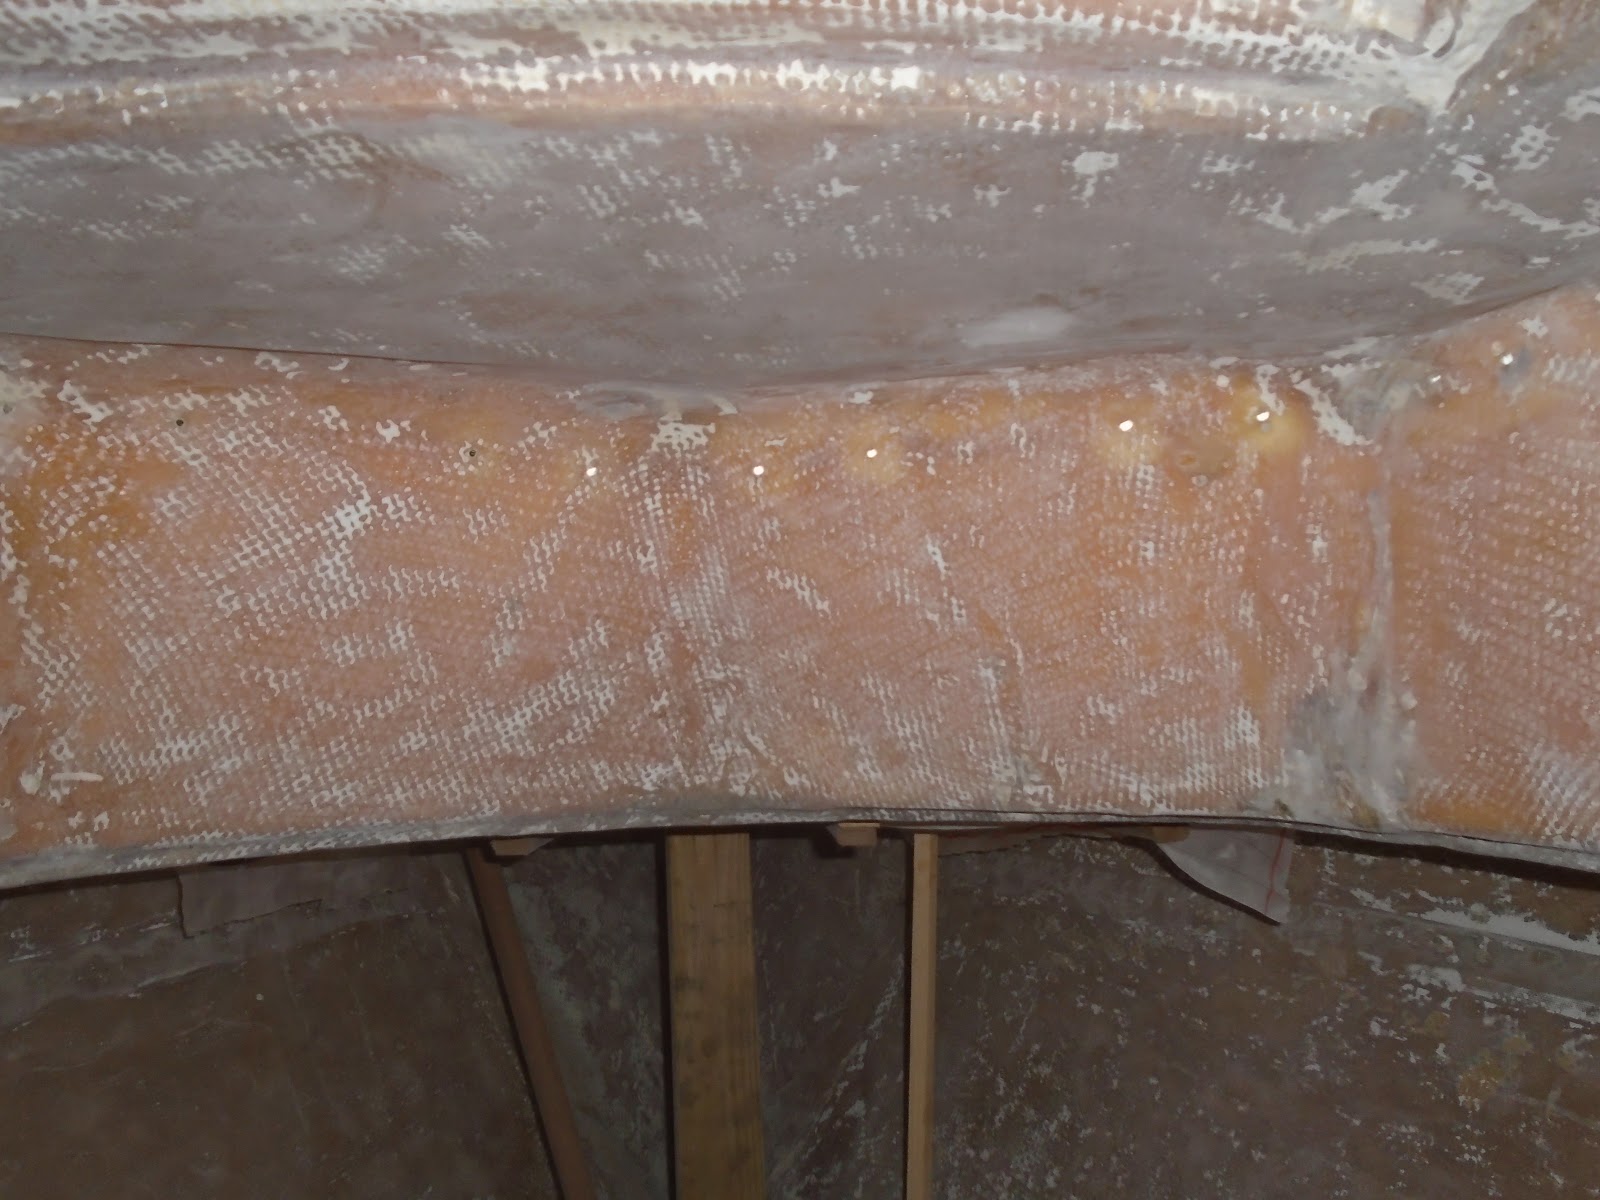
I transferred the door skin, with the first layer of 1708 biaxial cloth, to the boat and mounted it in place using the hot glue gun and wood strips to secure it.  I then braced further applied bracing from below to guard against any sagging with the thin door skin material.  I then went up on the foredeck and applied addition peel play / fabric release material.  By this time the resin was beginning to gel, and so a uniformed saturation of the peel ply was not achieved.  I will have to water-wash the top of the bottom skin and sand to ensure I have a good surface on which to apply further laminations / bonding new balsa core.  The day was a success though, and it felt good to be moving on with getting the foredeck closed up!


Total Time Today:  5.5 hrs

Monday, December 24, 2018

Coring the Aft Deck


December 24, 2018


There are several locations across the deck of the Allied 24 that require new core and either top skin, bottom skin (or both) repairs:  the location of the aft cleats on the poop (aft) deck, a significant portion of the coach roof, and the foredeck in its near entirety.  I am at a stage in the restoration where I need to begin repairing these areas.  Of course, I have yet to sand the deck and topsides, but that will soon come.  I wanted to get the deck "sealed" up as more a matter of peace of mind (aka need for a nice milestone), so to that end I got to work.

I had removed the damaged core in a previous work session, and then followed that up with grinding roughly a 3" taper in the deck around the area where the core was removed.  Essentially, I had the work area prepped; I did need to remove any fine contaminates, so I thoroughly wiped all surfaces to be worked with acetone.  This process primes the glass, and other surfaces, to receive new laminations.  The next step would be to create templates for the new material: balsa core, and two layers of 1708 biaxial fiberglass.  I began with the port side of the aft deck.  I laid out a piece of plastic, and then traced for the inner balsa core, an initial layer of 1708 biaxial, as well as a secondary layer of 1708 that would cover the entire work area.   


I then repeated the templating process on the starboard side of the aft deck.


With my templates in hand, I returned to the shop and unfurled a rather large piece of 1708 biaxial cloth.  In cutting the 1708 biaxial for the new top skin, I began, naturally, with the larger of the templates, and worked my way to the smaller.  I cut out the larger template (the secondary piece) from the plastic templating sheet, and then laid it out onto the fresh fiberglass.  I traced the outer edge of the template as my cut line, and then removed the secondary layer of 1708 biaxial with a pair of very sharp scissors.  I cut out the template for the first layer of 1708 biaxial from the templating sheet, laid it onto the fiberglass, traced it for a cut line, and then removed the first layer of 1708 biaxial from the fresh fiberglass.  I now had both layers of 1708 biaxial ready.  Next, I cut out the balsa core template from the templating plastic sheet, laid the template out onto the 1/2" balsa core material, and then removed the new core.  I applied this process to both the port and then the starboard side, preparing all new material for installation. 


With the new materials cut and set to the side, I focused my attention on the work surfaces.  As I mentioned previously, I wiped the surfaces down with acetone to remove any remaining contaminates - shown below.


Next, I mixed a small pot of "neat" epoxy - West System epoxy resin without any thickening agents - and "painted" out the work surfaces, including the exposed edges of the original balsa core material.  This process of painting out the surfaces is to ensure there are no resin-starved surfaces/materials that could contribute to future issues in the lamination.   After the surfaces were wet out with the neat epoxy, I then mixed another batch of resin.  This time, I thickened the epoxy with 406 colloidal silica and 407 low-density filler.  This combination creates an exceptionally strong gap filling material.  I applied this thickened material to the small voids in the perimeter of the areas to be cored and across the top surface of the bottom skin, creating a "bed" of thickened epoxy for the new core in nestle into.


With the deck voids further prepped and ready for the new balsa core, I pressed the port side core into place.  I firmly worked the new core patch into place while making sure that I saw ample squeeze out of the thickened epoxy.  With a small squeegee, I worked the thickened squeeze out epoxy into the voids to ensure no gaps existed between the new and original core material.  


I repeated this process with the starboard side of the aft deck.  


I failed to capture step-by-step pictures for the following work sequence, so you'll have to use your imagination along with my Pulitzer-worthy prose...

I applied the first layer of 1708 biaxial cloth over the new balsa core material.  I wanted to ensure that I had a fair surface for the secondary layer of 1708 biaxial cloth, so I mixed and applied another layer of thickened epoxy, using the same 406 and 407 thickeners, to the top of the first layer of 1708.


With the surfaces of the port and starboard work ready for their next layer of 1708 biaxial, I wet out the sheets and applied them.  With the secondary layers of 1708 biaxial applied and covering the entire work surfaces, I work them in with a squeegee to ensure no air bubbles were caught and that I achieved a good bond.  My final application would be a layer of release fabric.  This release fabric would reduce the need to sand the cured epoxy, itself creating a textured mechanical bonding surface.  Whenever I can avoid sanding fiberglass...I'm all over it!


Total Time Today: 2.25 hrs

Sunday, December 16, 2018

Fairing the Overhead (Part 1)


December 16, 2018


In the coming days I would be working to smooth out the interior of the doghouse, or cabin top (including the overhead).  There were a number of voids in the laminate that required filling and fairing - no doubt a job not evenly remotely considered by the previous "yard".  The wholesale failure of the coach roof required a build out from the shell of the laminate - from the bottom and top skin of the overhead itself.  There are, in places, areas of the overhead with no core material in place; and there are, in places, areas where the bottom skin is as fragile as tissue paper...after the local 3rd grade class had there hand at it!  The structure of the overhead, where the mast would be stepped, lacked in integrity, but would be built up to withstand the forces it would be subjected to.

I began the day by cleaning the previously sanded surfaces by vacuuming, first, and then wiping down with a solvent to remove any remaining contaminates.  With the surfaces free of contamination,  I then prepared a small amount of epoxy resin mixed "neat", that is to say that the epoxy resin in a straight mixture of resin and hardener, and without any thickening agents.  I then applied the "neat" epoxy resin to the areas of focus for this afternoon.


I applied the epoxy resin to the areas encompassing the mast support and the overhead forward of it.


With the old overhead laminate wet out with the "neat" epoxy resin, I then came back and filled voids in those same areas with more epoxy thickened with West System 403 microfibers. With the significant voids filled, I then applied a couple layers of 9oz fiberglass cloth to the encapsulated
mast support beam.  The support beam was in a state of...well, it was in a state.  So, as a first order of business to reconstructing the mast support beam, I properly filleted the transitions and then applied cloth to the structure.  I tackled the port side to begin with.


I repeated the same process for the starboard side...


...and then completed the job with wrapping the center portion of the mast support beam with the same 9oz cloth.  This initial application of fiberglass to the mast support beam is, well, initial.  There will certainly be more to come to ensure that the mast is properly supported, and, dear reader, I will need to beg your indulgences.


I completed the day by wetting out and filling the voids in the forward portion of the overhead, or doghouse.  I first started with the port side...


...and finished on the starboard side.  The intent is to produce an aesthetically pleasing painted interior surfaces, but to also increase the laminates durability.  More of this to come... 


Total Time Today: 3.5 hrs

Saturday, December 15, 2018

Tapering Edges for Various Deck Repairs


December 15, 2018


After a seriously busy month of work (the day-job), and projects around the house, I was able to get back to the Allied today.  My focus was getting after the deck repairs: finishing any remaining core removal, tapering edges for laminating new top skin, and sanding slight concave surfaces around holes to be glassed and filled.  I began with removal of the top skin and core in the area of the cabin top where the massive mast step was installed.  The sheer size of the former mast step was the result of much needed rigidity and support over a very soft and sagging cabin top.  Future repairs (new core and top skin, encapsulated mast supports, and new primary bulkheads properly tabbed to the overhead and hull surfaces) will ensure that the cabin top will be strong enough to support and transfer the loads of the mast, while also freeing up space on the cabin top with the use of a properly sized mast step. 


After marking cut lines, I used an oscillating tool to remove the top skin, and then cut out the disintegrating core material with the same tool.


At the forward (visible) portion of where the port companion slide hatch rail was installed, I could see that water had penetrated into the core and caused damage.  


I marked cut lines for removal of what I imagined might be enough material - knowing I could remove more material if need be.  As it turned out, I did remove enough of the core and top skin to rid this cabin top of damaged core in this location.  Removing this last section of core would be a turning point, from here I could now focus on reconstruction of the cabin top.


With new core and top skin installation in the near future, I decided to sand tapered edges around the areas of old core and top skin removal.  The tapered edges would allow me to tie in the new top skin with the existing cabin top surfaces.  The tapered edge is approximately 3 to 4" in width.


Another view of the cabin top, looking aft.


After completing the tapered edges on the cabin top, I moved forward on the Allied and tapered the edges on the future foredeck repair.  In this area of the boat, I will be rebuilding the bottom
and top skins, with new core material to strengthen the deck.


I moved aft and began to "dish-out" the various fastener holes and bits of boat kit (bulkhead-mounted compass, shore power, solar power and battery charging controllers).


After taking care of the aft bulkhead of the doghouse (or cabin top), I moved to the aft deck and sanded tapers in the areas to be re-cored, as well as various old fastener holes and miscellaneous
deck penetrations.


I worked forward on the port side of the cockpit well and seating, preparing these old scars for new fiberglass and fill-and-fair work.


I repeated the same sanding work on the starboard side of the cockpit well and seating.  There will be some additional prep work for new fiberglass (enclosing the old icebox opening and a few other small fastener holes), but the next significant job will be sanding the deck surfaces and topsides to remove the old paint coatings.


Total Time Today: 4.25 hrs

July 29, 2020 The day had arrived!  Time to apply the name of the vessel...S/V Sea Hagg, hailing out of Key Largo (there's on...