Monday, December 16, 2019

Lazarette Buildout (Pt 3) & Varnish Work


December 16, 2019


The next few weeks will be FULL of boat work, in a race to get her completed by February.  Today, I started with the varnish coats on the hatches.  I decided to use a TotalBoat product that eliminates the need for sanding between coats, within 12 hours.  I decided to start this morning, and following a schedule that has me applying a coat every 10 to 11 hours.  With the first coat on, I packed things up and headed for the boat.


My first order of business was to removed the peel ply fabric from the surface G-10 plate and biaxial I applied previously.  I then water-washed the edges of the vertical panels I epoxied in place.


Next, I cut two lengths of teak stock for cleats to support the shelf panels in the lazarette.  I drilled and countersunk three screw holes per cleat, pre-drilled for #10 1.25" screws.  I cleaned the surface of the cleats as well as the aft-facing portion of the cockpit bulkhead.  With the cleats prepped, and the surfaces, I glued and screwed the cleats in place.


At this point I went ahead and sanded the interior hull of the lazarette, including the edges of the vertical panels - accomplishing this with both human power and machine assisted power.


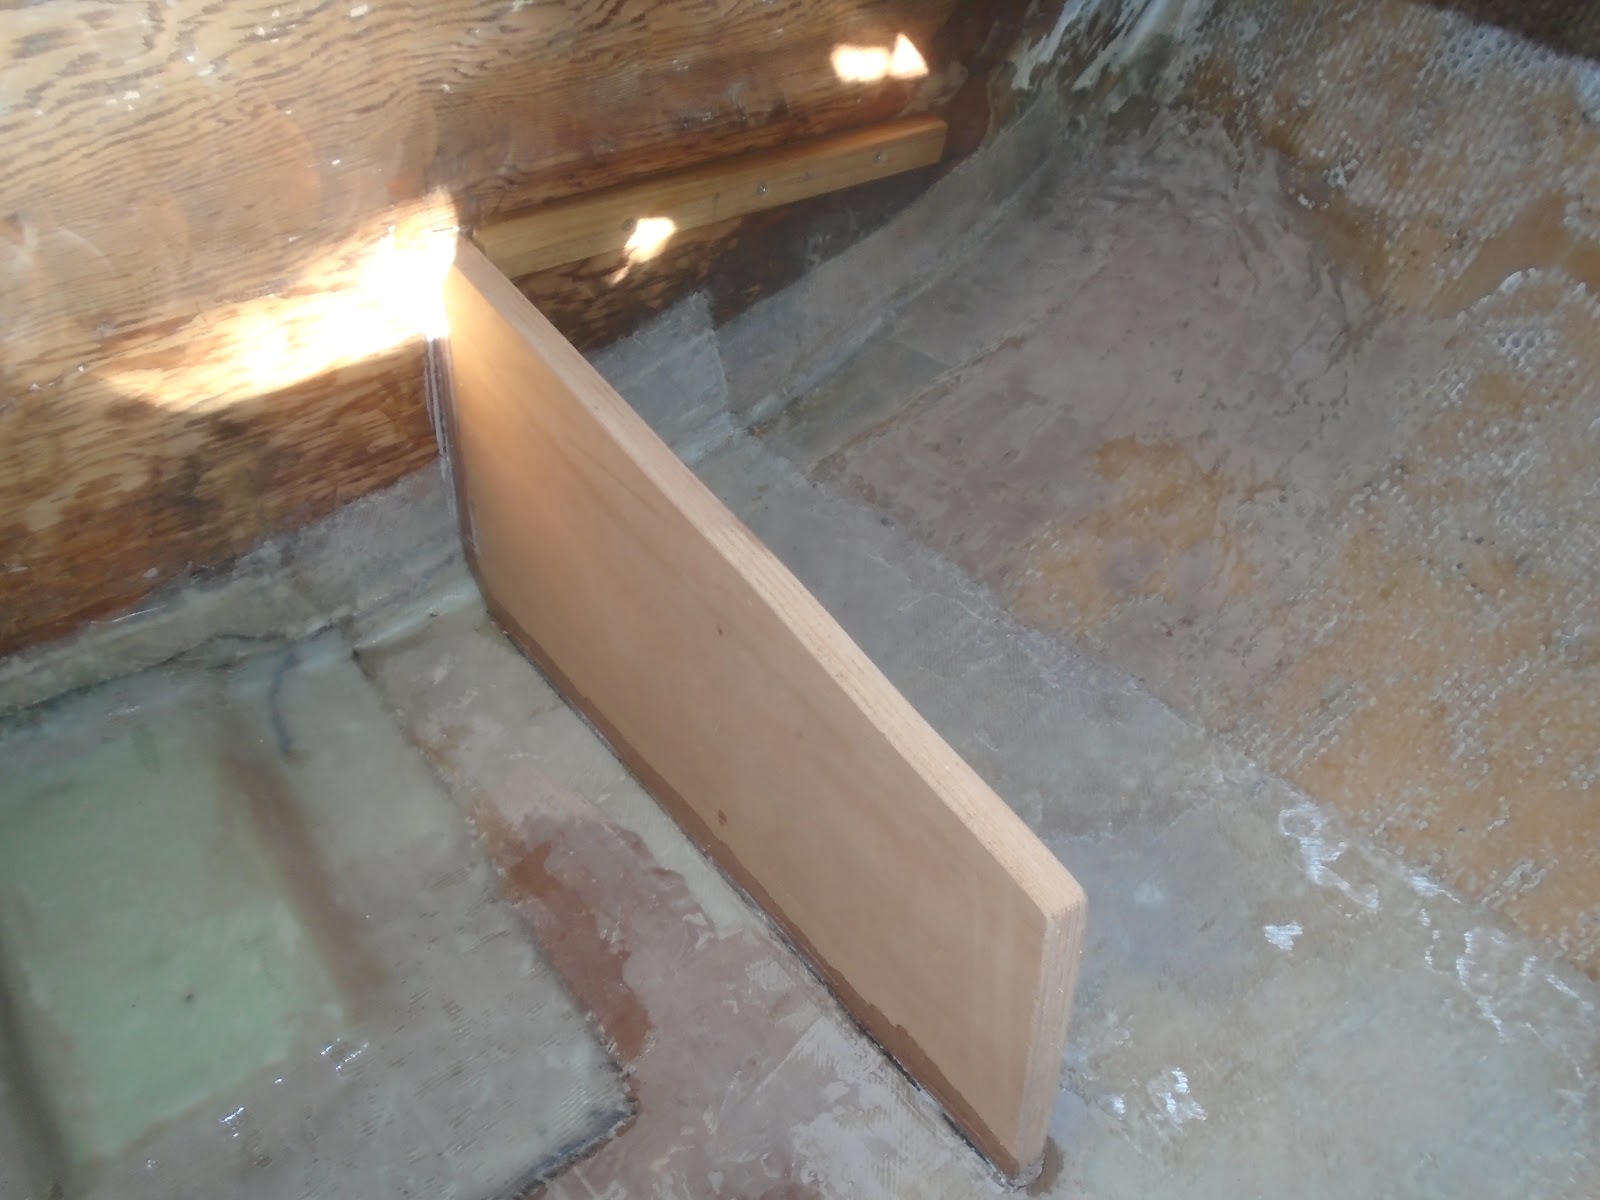
I cleaned up the lazarette by both vacuuming and solvent-washing all surfaces.  With the area prepped for further work, I broke out some cardboard and began templating the shelf panels.  Using a compass  after cutting a rough shape of the outboard edge of the hull, I transferred the contour onto the cardboard and cut the excess off.  


I transferred the cardboard templates to a sheet of 3/4" meranti, and then with a jigsaw removed the shelf panels.


There was a bit of refining of the shape on the port side, including trimming the angle of the outboard edge of the shelf panel to accept the curve of the hull.


I repeated the work with the starboard shelf panel.  With the shelf panels fitted, I removed them and headed for the shop to begin work on tabbing the vertical panels to the hull.


I cut lengths of 4" biaxial tabbing for the panels - enough to apply two layers to each of the intersecting surfaces of the vertical panel and hull.


The photo above contained the tabbing materials for the port side, and below for the starboard side.


I wet out the tabbing material, and then mixed a pot of thickened epoxy in to form fillets.  These fillets, or thickened epoxy formed into a radius, would allow the tabbing material to wrap smoothly from vertical panel to the hull without trapping air.  I completed one side at a time, and then covered the work with peel ply to reduce the need for sanding.


Taking things as far as I could in the lazarette, I began to fabricate fiddles for the shelf panels.  These fiddles would serve to keep items stored on the shelf...on the shelf - though a tie-down system would be encouraged for any item that could damage the wiring for the electric motor.  These fiddles were fabricated with teak stock.


I finished the day by applying another coat of varnish to the hatches - coat #2.


Total Time Today: 5 hrs

Sunday, December 8, 2019

Lazarette Buildout (Pt 2)


December 8, 2019


Having only a few hours time today for the Allied 24, I got straight to work on the cockpit locker hatches - having a bit of filling and fairing work to do.  The outboard edges of the cockpit lockers were at one time fastened with piano hinges, running the length of the hatches.  In a previous work session I had filled the holes from the underside.  Today, I bored out the old fastener holes from the top of the hatch, and prepped them to fill with thickened epoxy.


I vacuumed up the detritus, and solvent washed the surfaces.  With some "neat" epoxy resin (not thickened yet), I painted out the laminate to prepare for the thickened epoxy. With the remaining resin, I thickened it with a combination of 406 colloidal silica and 407 low-density fillers, and filled the fastener holes.


On the inboard edge of one of the hatches, I had previously dished out the laminate to prepare for a fiberglass patch.  The size of the old fastener hole in the this location would prevent me from simply filling it with thickened epoxy and then sanding the surface fair.  So to that end, I cut a small patch of 1708 biaxial cloth, wet the surface out and the fiberglass, and then applied the small fiberglass patch.   To finish things off, I applied a skim coat of fairing compound to the patch.  The next step for the hatches will be sanding and a final application of fairing compound prior to priming them.


Back on the boat, I turned my attention to the lazarette.  Yesterday I had templated and cut the inboard panels for the port and starboard shelving.  I was now ready to glue them in place.  I made sure each panel was plumb and square to the aft cockpit bulkhead, and then made marks on the interior of the hull to make sure I returned the panels to their proper positions.


I cleaned up the surfaces of the panels and the hull to prep for epoxy work.  I then mixed a pot of epoxy resin without any thickening agents to paint out the edges of the panels where they would come in contact with the boat.  Next, I mixed up some resin and thickened it with the usual 406/407 recipe.  This thickened epoxy was then applied to the edges of the panels, and then pressed into position.  I made sure that each panel was plumb, and then taped off each panel at a couple points to keep them from wondering outside of their plumb and square orientations.


The work to come will include tabbing the inboard panels to the hull, and templating for the shelf panels themselves.  


With things taken as far as I could with the shelving, I began work on the backing plate for the electric motor installation.  I selected and cut a piece of G-10 to use as the backing plate - a fiberglass and epoxy resin infused lamination producing an incredibly strong panel product.  The factory finish on the G-10 board is smooth, and requires some "roughing" up to create a textured surface that would promote a good mechanical bond.


I painted out the surface of the boat and the G-10 board with "neat" epoxy, and then followed that with a generous amount of thickened epoxy on the hull of the boat.  I pressed the G-10 board down into the thickened epoxy, gently rocking it from side to side to make sure that I had good contact and no voids beneath.  I put a small level on the board of make sure that it was level from side to side.  


My next task was to encase the G-10 backing plate in a couple layers of 1708 biaxial cloth, finishing it off with a layer of peel ply.  The peel ply would eliminate the need to water-wash to remove amine blush and sanding to create a rough surface for further epoxy work (paint or resin).


Total Time Today: 2.75 hrs

Saturday, December 7, 2019

Priming the Cockpit & Lazarette Shelving Buildout


December 7, 2019


I got started today by water-washing the fairing round that I had applied to the cockpit in the previous work session.  The water-wash was to remove the amine blush that forms on the cured surface of the epoxy fairing compound.  I used my go-to tools: scotch write pads with water to remove the blush.


With the surfaces of the faired areas clean, I moved on to both hand-sanding and sanding with the 6" Bosch DA sander.  Over the course of a couple hours, I brought the faired areas to a point where primer paint couple be applied.  


In the shop, I mixed the Interlux 2-part Primekote product, and waited the 20-minute induction time period before getting started with the priming.


I applied the primer paint both with a foam brush as well as a foam roller pad.  For the most part, the area was prepped for finish paint.


With the cockpit primed, I turned my attention to the lazarette.  The work required for the lazarette was both installation of the backing plate for the Torqeedo motor mount and shelving to port and starboard of the centerline.


I prepared the backing plate for the pod-drive motor installation, using a 5/8" sheet of G-10 fiberglass panel. I allowed for 1.5" around the extreme width and length of the motor mounting pad.  Final installation would come tomorrow.


I then began work on the shelving, to both port and starboard.  I used panels of cardboard to replicate the surface of the lazarette.  


I scribed the aft cockpit bulkhead and interior surface of the counter onto the cardboard shelf analogues.  


I applied the cardboard analogue to a sheet of meranti plywood, and cut out the shelving bulkhead.  I then transferred the inboard to outboard angle of the transom to the bulkhead, and then removed the surplus material...resulting in a tight fit.


I repeated the process for the port side....and prepared for gluing in during the next work session.


Total Time Today: 5.5 hrs

Saturday, November 30, 2019

Cockpit Fairing & Hatch Varnish Work


November 30, 2019


With a number of domestic items to cover and bring to a close over the weekend, I was limited today to the time on the boat.  I did, however, make the most of it and set myself up for a productive day tomorrow.  The first thing that I did was to water-wash the skim applied to the bridge deck in the previous work session - to remove any amine blush that might have formed on the cured epoxy surface.  After drying the surface, I used the 6" Bosch sander to sand the surface down.  After sanding, I realized that I needed yet another skim coat to complete the bridge deck repair, so I did just that.  


While I was at it, I took the opportunity to fill (after sanding and solvent-washing the areas) a number of small voids within the cockpit - most along the settee and gutter edges of the cockpit lockers and aft well locker.  These areas will be sanding far tomorrow, prior to the final primer coat of paint.


In the cockpit, to starboard, I needed to effect a repair to the winch cubby.  There was a bit of flex on the inward-forward top corner of the cubby, so to reinforce it I removed paint down to bare fiberglass and prepped for a couple layers of 1708 biaxial fiberglass.  I cleaned the surfaces with solvent, and then wet them out with neat epoxy.  I returned to the shop and wet out two layers of 1708 biaxial and then placed a layer of peel ply on top of the two layers of fiberglass.  With the remaining resin, I thickened it with 406 colloidal silica and 407 low-density fairing compound.  With this fairing compound, I smoothed out the roughest of the surfaces within the winch cubby.  With the surfaces prepped within the winch cubby, I returned to the shop to pick up the fiberglass.  Back on the boat, I placed the fiberglass cloth, with peel ply, into position and ensured that any trapped air was removed from the laminate.  The repair will significantly reinforce and correct any flex issues with the winch cubby. 


With remaining time, I had the three hatches sanded and ready for the start of 5 successive coats of varnish which will complete them and ready them for installation.


Total Time Today: 2.25 hrs

Monday, November 25, 2019

Sanding and Primer Paint for the Interior and Stern

November 24, 2019


I got started today sanding the interior of the boat, the areas that I had spot-filled in the previous session.  Those “spot-filled” areas were in fact quite numerous due to the raw nature of the hand-laid laminate’s inner most layer of glass being a heavy roving.  So, I took the time to minimize the irregular surface by applying fairing compound.

So today I would need to sand back the fairing compound, blending it into the greater surface area.  I used the small 5” random orbital sander and 180-grit sanding discs.  I worked the interior from the bow of the boat to the main cabin.  Since there were a number of areas in which the sanding broke through the initial layers of primer, down to bare fiberglass, I would need to apply one more sealer coat of primer paint.  I planned accordingly.


With the interior sanding completed, I headed into the cockpit and sanded the last skim coat of fairing compound applied to the bridge deck.  The sanding revealed the fact that I would need one more skim coat applied. 

I quickly moved on to sanding the stern of the boat.  The stern – and the motor mount – makes up the last of the exterior that requires primer paint.  I had applied a bit of fairing compound to the stern in the previous work session, to help fair the center line of the stern – the location of the exterior aft chainplate.  I worked this area with 150-grit sanding discs until I had achieved  a fair surface.


With the sanding complete, I retreated to the wood shop to begin to mix paint.  I started with the exterior primer, the Alexseal primer.  I mixed enough paint for the stern and the motor mount aft of the rudder.  With the paint mixed, I spent the 20-minute induction period required for the paint to catalyze by cleaning the surfaces to be painted.


I applied the primer paint to the stern, and then moved down to the motor mount.


Completing the exterior paint, I moved to the interior and applied the TotalBoat epoxy-based primer paint.


The application of the primer paint on the interior went rather quickly since I was not priming the entirety of the interior – just those areas that I had spot-faired and sanded.


I finished up on the interior, applying two coats to all of the areas that I had faired.  I closed up shop and headed home.


Total Time Today: 5 hrs

Sanding the Interior, Spot-Fairing, and Some Brightwork


November 23, 2019


With a full day to work on the Allied 24, I decided to get back inside and bring the interior to a conclusion.  Sure, there are a number of things that one would want to do to the interior, but we have to draw the line somewhere, right?  What is left for me is the completion of painting the interior, installation of the battery and battery box, and trim work.  To that end, I got started on sanding the primer paint.


With 120-grit sanding sponges, I made my way from the v-berth back to the saloon.  The effort here was to simply scuff up the cured epoxy-based primer paint so that I could spot-fair and then apply the finish paint.


The finish paint to be applied will be Interlux Premium Yacht Enamel.  I finished up the sanding, to include the v-berth and main saloon settees, and then moved on to vacuuming and wiping down the surfaces to remove any remaining sanding debris.


While I was prepping for the finish paint, I knew I had to take advantage of the state of work to affect a more robust repair on a couple areas of the underside of the side deck.  Curious enough, the repairs areas were essentially mirroring one another to port and starboard. 


The voids were large enough to make me want to apply some thickened epoxy as well as a layer of 1708 biaxial cloth.  I wet the areas out with epoxy resin, applied the thickened epoxy, and then the layer of 1708 biaxial.  I finished the repair by applying a layer of peel ply to eliminate the need to water-wash to remove the amine blush, followed by sanding to prep for additional work.  After the epoxy cures I will simply “peel” off this fabric, taking the amine blush with it.  The surface will be ready for additional work.  


Now that I had the two fiberglass repairs tucked away, and all other surfaces vacuumed and wiped clean, I was now ready to begin doing a bit of spot-fairing.


I would be working with the TotalBoat TotalFair product – a two-part epoxy-based system that is ready to apply when you mix yellow and blue to make green.  


When I say a little, I actually mean a lot!  There were a TON! of small voids in the laminate that were just bugging me.  I know the owner would be constantly looking at these specs while below.  In addition, the voids were a point of potential start of mildew and mold – capturing any condensation that occurred on the interior of the hull.


The sheer number of small voids was both impressive and daunting!  In the end, I managed through it.


I moved from the v-berth back to the main saloon.  The saloon, or main cabin, appeared to have roughly the same ratio of surface area to voids as the v-berth had.


In the end, I wrestled the beast to the cabin floor and conquered!  Tomorrow, I will plan to come back, sand the many areas that I had faired, and then apply the finish coat of paint.  At this point I extracted myself from the interior and got to work on the exterior.


The only remaining area of the topsides that I was not comfortable with was the stern.  The previous chain plate (externally hung) was apparently covering up a low spot in the laminate, and now that I had removed it I needed to address the unfair surface.  In previous applications of the topside priming paint coats 1 through 4, I purposefully did not paint the center line due to the unfair surface.  Today, I roughed up the surface one last time, wiped it clean of any contaminates, wet it out with epoxy resin, and then applied a final skim coat of fairing compound.


Back up in the cockpit, I applied (hopefully) a final skim coat of fairing compound to finish off the bridge deck repair.  This last bit of work would conclude my time on the Allied 24 today.  I gathered my materials and tools and headed back to the shop.


With the companionway slide hatch sufficiently cured, it was time to sand the top surface to knock down the teak caulking that stood proud of the teak slats.  I used 80-grit discs to knock down the “proud” material, and then finished things off by hand with 150-grit paper.  I blew the surface off with compressed air, and wiped it down with a solvent to remove any remaining sanding debris.

I decided to go ahead and apply a thinned coat of varnish (Epifanes Clear Gloss), so I gathered materials and tools and proceeded to apply a highly thinned coat. 


Total Time Today: 6.5 hrs


July 29, 2020 The day had arrived!  Time to apply the name of the vessel...S/V Sea Hagg, hailing out of Key Largo (there's on...