Friday, May 31, 2019

Epoxy-coating the Chain Locker Bulkhead


May 31, 2019


I grabbed a few minutes to epoxy-coat the chain locker bulkhead, in preparation for tomorrow's installation  -a fairly quick job.


Total Time Today: N/A

Monday, May 27, 2019

Fabricating Chain Locker Bulkhead & Painting Chain Locker


May 27, 2019


Getting back out onto the boat today, my singular goal was to fabricate the chain locker / collision bulkhead in order to complete at least the very forward portion of the interior.  I started by removing the weights that I had set upon the new v-berth tops for the glue-up process, allowing great access to the day's work area.


Next, I set a line from the bow (top most bolt for the forestay chainplate) to the companionway opening at the bridge deck.  I wanted to get the centerline established to allow for a reference point in the fabrication effort. 


With the centerline established, I used the hot glue gun and a few strips of door skin and wood blocks to establish a vertical structure outlining the aft face of the chain locker bulkhead itself.  The fore-aft orientation was also captured in this vertical structure.


My next step was to hot glue a panel of cardboard to the port side of the vertical structure, and then to use a compass to transfer the hull's shape onto the cardboard template.


Back in the shop, I used the same door skin material that had become the primary bulkhead template as a template for the chain locker bulkhead.  My intention, since the forward-most portion of the boat was a mirror image from port to starboard from the centerline, was to flip the chain locker template (port side) over and replicate for the starboard side. 


I transferred the shape of the hull to the door skin material, using the same compass set at a 2" width.


With the hull's port side reference marks onto the door skin, I grabbed a sheet of plastic and traced the reference marks onto the plastic, cut out the shape of the starboard side of the bulkhead, and transferred that onto the door skin. 


With the full bulkhead referenced onto the door skin, I retraced the lines with a sharpie since there were a number of previous marks already made to the surface. 


I decided to run the door skin template over the table saw, along its centerline, to cut the bulkhead template into two pieces.  I also removed a bit of material to either side the centerline on both halves. I then installed a sliding-lock mechanism to allow me to fine tune the orientation of the template in the position of the future chain locker bulkhead.


Back on the boat, I placed the door skin template in place, adjusted the slide-lock mechanism, and then took reference lines from the hull and transferred them to the template.  Prior to taking the reference lines, I ensured the template was sitting plumb to forward and aft.


Returning to the shop, I pulled the 3/4" sheet of meranti plywood out, and transferred the template and its hull reference lines to the plywood.


I removed the Allied's new chain locker bulkhead from the 3/4" meranti, and returned to the boat to test fit and adjust as needed.


While the new chain locker was in its future position and plumb forward and aft, I took note of its location by transferring the outboard edges to the hull with a pencil, as well as the overhead.  I did this for the forward and aft face of the bulkhead.


It was a back-and-forth day!  Back in the shop, I marked the opening (per the owner's guidance) in the bulkhead itself.  I used an eased radius on the "corners", and allowed for ample "reach-in" room for future work and cleaning of the chain locker.


The test fitting of the chain locker bulkhead prior to final installation - all looks good.  After ensuring the fit, I removed the bulkhead and both vacuumed and solvent-washed the chain locker to prepare for paint.


With the surfaces prepped, I used the compass to scribe lines along the port and starboard hull surface, and the overhead, three inches forward of the mark that I established as the forward face of the bulkhead itself.  The reason for the three inches is to allow for 6" tabbing to be applied to the bulkhead and hull surface - three inches up the bulkhead and three inches onto the hull.  Painting here would only require me to remove it by sanding prior to the fiberglass tabbing of the bulkhead.  The chain locker received three coats of TotalBoat TotalProtect, an epoxy-based barrier coat product.


Total Time Today: 7.25 hrs

Sunday, May 26, 2019

Final Install V-berth Tops & Skim Coating Cabin's Aft Bulkhead


May 26, 2019


The whole tribe was recently hit with what appeared to be a 24-hr bug...and we literally spent the entire Saturday in pajamas, nursing one another.  Well, by this morning everyone was back in the land of the living, and so I made it out to the Allied 24 by mid-day.  My goal today was to get the new v-berth tops glued to the existing molded fiberglass v-berth, as this would allow be to tab the outboard edge of the tops to the hull's surface (to port and to starboard), and would also allow me to begin constructing the chain locker bulkhead (just forward of the v-berth itself.

I began by placing a sheet of plastic over the top of the port side v-berth, covering the fiberglass.  I carefully ran the edge of the plastic along the existing intersection of the fiberglass v-berth and the hull, and taped it in place.  I then secured the inboard edge of the plastic to ensure it would not move during the process of "mapping" the areas in which I ground the gelcoat down to bare fiberglass.  As implied, I traced the areas that I had removed the gelcoat, replicating them onto the plastic sheeting.  I then removed the plastic sheeting, placed it on the underside of the new port v-berth top, and transferred those areas to the bottom of the v-berth top.  

My goal here was to not coat the entirety of the bottom surface of the v-berth top, but rather just those areas that would come into contact with the thickened epoxy to be placed onto the molded fiberglass surface.  The epoxy resin has a greater hold capacity with fiberglass, rather than gelcoat, and the application of resin to the wood surface would ensure that there was sufficient epoxy to adhere the new wood v-berth top to the molded fiberglass surface - wood has a tendency to absorb the resin, leaving an insufficiently epoxy-rich bonding surface.

I repeated the process of transferring the bonding locations to the new v-berth top on the starboard side as well.  With surfaces prepped, I returned to the shop and mixed a small pot of resin.  I applied the neat resin (no thickening agents) to both the underside of the new v-berth tops and the original molded fiberglass v-berth - in those strategic glue locations.  Next, I returned to the shop and mixed a larger pot of resin, and this time added 406 colloidal silica and 407 low-density filler to created a thickened epoxy mixture.  Back on the boat, I placed this thickened resin mixture in the areas that would enable the bond between the fiberglass and the new v-berth tops.

I placed the v-berth tops in their final resting positions, and sufficiently weighted them for their curing stage.  Tabbing the outboard to the hull will complete the install, and the edges will be finished with teak fiddles.


I moved aft, into the cabin, and prepared the cabin's aft bulkhead for a skim coat of thickened epoxy in order to fill the weave of the 1708 biaxial cloth.  Awhile ago, I added balsa core material and a top skin of 1708 biaxial fiberglass to "beaf-up" the cabin's aft bulkhead.  The original construction was a rough 1/4" thick laminate, appearing a bit under built, I wanted to create some bulk here to prepare for eventual companionway trim.


Through the curing of the 1708 biaxial I had placed peel ply over the surface, so sanding was not required.  Instead, I solvent-washed the surface to remove any lingering contaminates.


With the surface prepped, I returned to the shop and mixed a batch of thickened epoxy.  Using a squeegee, I applied the thickened resin to the surface of the fiberglass, filling the weave of the glass itself.


I repeated for the port side, and also was able to hit various spots on the overhead.


Total Time Today (in 100 degree heat): 3 hrs

Sunday, May 19, 2019

Sealing Thru-Hull Patches & Sanding Sail Drive Mounting Tray


May 19, 2019


Picking up where I left off in the previous work session, I quickly got to work water-washing the final skim coat of fairing compound on the thru-hull patches.  With the amine blush removed, I set up the 5" DA sander to knock down and smooth out the patches prior to sealing them with a coat of neat epoxy resin.  Since the fairing compound would live under the waterline, and since fairing compound has an inherent susceptibility of eventual water ingress, it needs to be sealed with epoxy resin...or the like.  In this case, I will be sealing with resin as well as applying a coat or two of epoxy-based barrier coat that is designed specifically for below the waterline.


I quickly made my way around the bow the Allied 24, sanding both the port and starboard patches.  The skim coat from the day previous was just that - a light application to just hit the occasional low spot or void.


I worked aft to also quickly sand the port and starboard patches located there.  With the sanding completed, I solvent-washed the patches to remove the sanding residue and to generally prepare them for epoxy resin coating.


I mixed a small pot of neat epoxy resin - resin without any thickening agents like 406 colloidal silica, 407 low-density fairing compound, and the like.  I then applied this neat epoxy to the patches with a 2" foam brush, and essentially tipped the application to even the flow out and produce a nice and flat surface.  The next time the barrier coat paint comes out these four patches will get a few applications to complete their repair.


Back in the shop, I removed the reassembled sail drive mounting tray that I had cut into two halves along its center line.  I cut the mounting tray in half to both remove the sail drive mounting pad (shown below, inside the mounting tray, and to provide some room for bedding compound since the original fit was extremely tight. 


Show below, the mounting pad inside the mounting tray.  As described in a previous post, the mounting tray will be glassed onto the counter of the Allied 24, supported by many layers of 1708 biaxial cloth to help spread the load which will be generated by the sail drive itself. 


I also water-washed the reassembled mounting tray, and then proceeded to sand all surfaces.  By the time I had come to the close of my available work time, but things were set for the next phase of the mounting tray - filling the fiberglass weave with fairing compound and generally preparing it to be installed onto the boat.


Total Time Today:  1.25 hrs

Saturday, May 18, 2019

Fairing Thru-Hull Patches and Bow, Fabricating Saildrive Mount


May 17 & 18, 2019


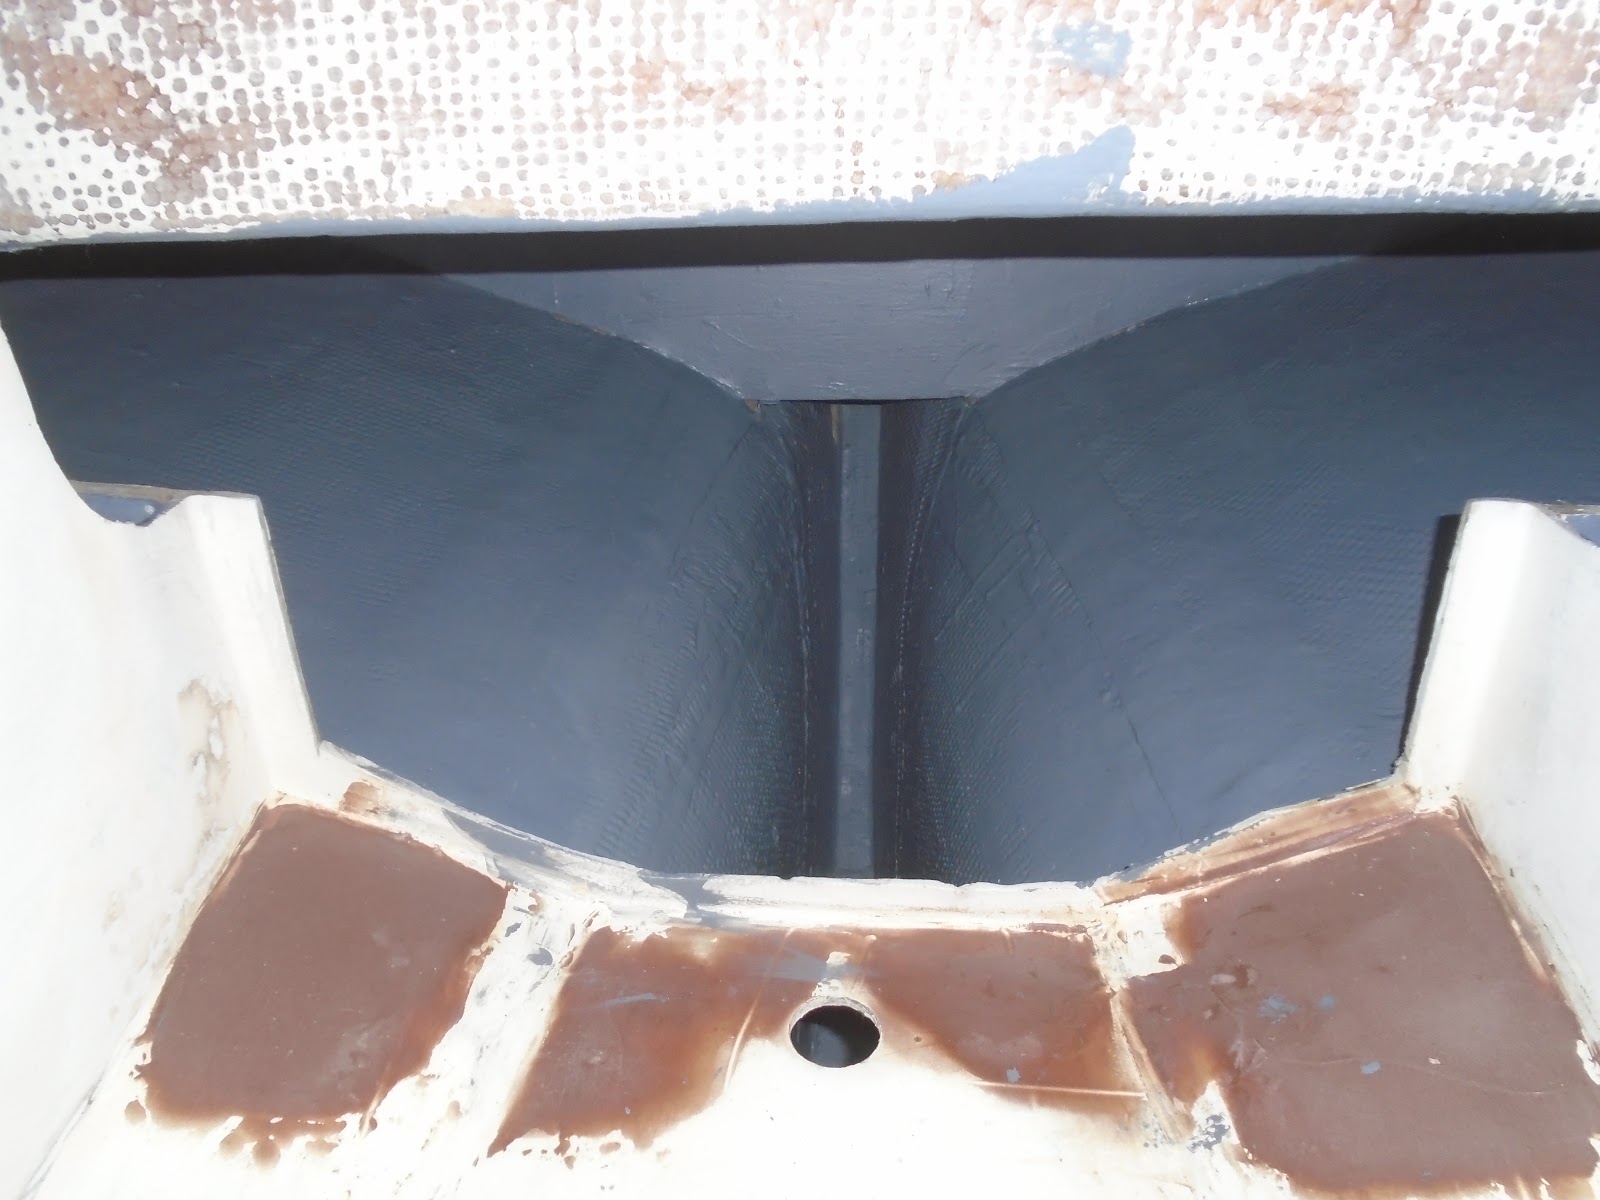
I began Friday afternoon by preparing for the fabrication of the sail drive mount.  Well, more like a recessed space that the Torqeedo's sail drive mounting pad could be recessed into, helping to achieve proper alignment.  Previously, I had used the router to remove a significant portion of the laminate aft of the rudder and in the surface of the counter.  I had routed deeper into this area in the forward portion, and gradually made shallower cuts as I moved aft.  The purpose for this change in depth of cut was to produce an angle that would put the sail drive in a slight descending orientation.

With the rough opening prepared, I took measurements for a mounting "tray" that would be fiberglassed into the rough opening.  The planned "tray" would include a recess that the Torqeedo's sail drive mounting pad would fit within.  The overhead work required that I do this in two parts: first created a rough opening, then create the recess for the mounting pad that ultimately could be glassed into/onto the rough opening.


Anyway, I took measurements of the rough opening to understand the maximum dimensions that I had to work within for the mounting pad "tray".


Using a piece of pressed board, I cut four sections that would create a mold to lay up fiberglass for the mounting pad's tray.  


I taped all surfaces of each of the four pieces, including the mounting pad itself (the black teardrop piece on the photos), to prevent the epoxy resin from sticking to them.


I then cut the required pieces of 1708 biaxial fiberglass cloth for the tray itself.


I prepared the fiberglass cloth by applying epoxy resin to wet it out, and then assembled the mounting pad and mold.


I first laid the fiberglass cloth in the mold, alternating a layer across the bottom, then a wide layer that ran up both lengthier sides, then two narrow strips running up both ends, and a final wide layer.


I placed the mounting pad itself into the mold - fully taped to protect its surface.  I then mixed batches of thickened epoxy resin to pour into the mold.  The resin was thickened just enough to still allow it to flow, and it did nicely - filling in the voids around the mounting pad.  I then placed the mold into the shop's refrigerator to help control the kick (heat) of the epoxy cure.  While the epoxy kicked off, I moved onto other tasks over on the Allied itself.


Those "other tasks" will be duly noted, but first, let's get back to the mounting pad tray...  I used the oscillating tool and cut along the center line of the now partially cured mounting tray, and then removed the Torqeedo's sail drive mounting block.  I was left with two parts, cut along the center line, that perfectly replicated the shape of the mounting block.  Since I wanted a fit that allowed for some bedding compound (Sitka Flex 291, or the like), my intention was to glass the two halves back together, but with a slight spacing imparted in the effort.  To this end, I sanded the surfaces that would be re-bonding to one another, and then cut-off the excess glass above the mold itself.  Using 10oz cloth, I bonded the two halves together, and then filled the new inner cavity with thickened epoxy.  Once things cure, I will come back and add some additional 1708 biaxial to the tray to further strengthen the tray.


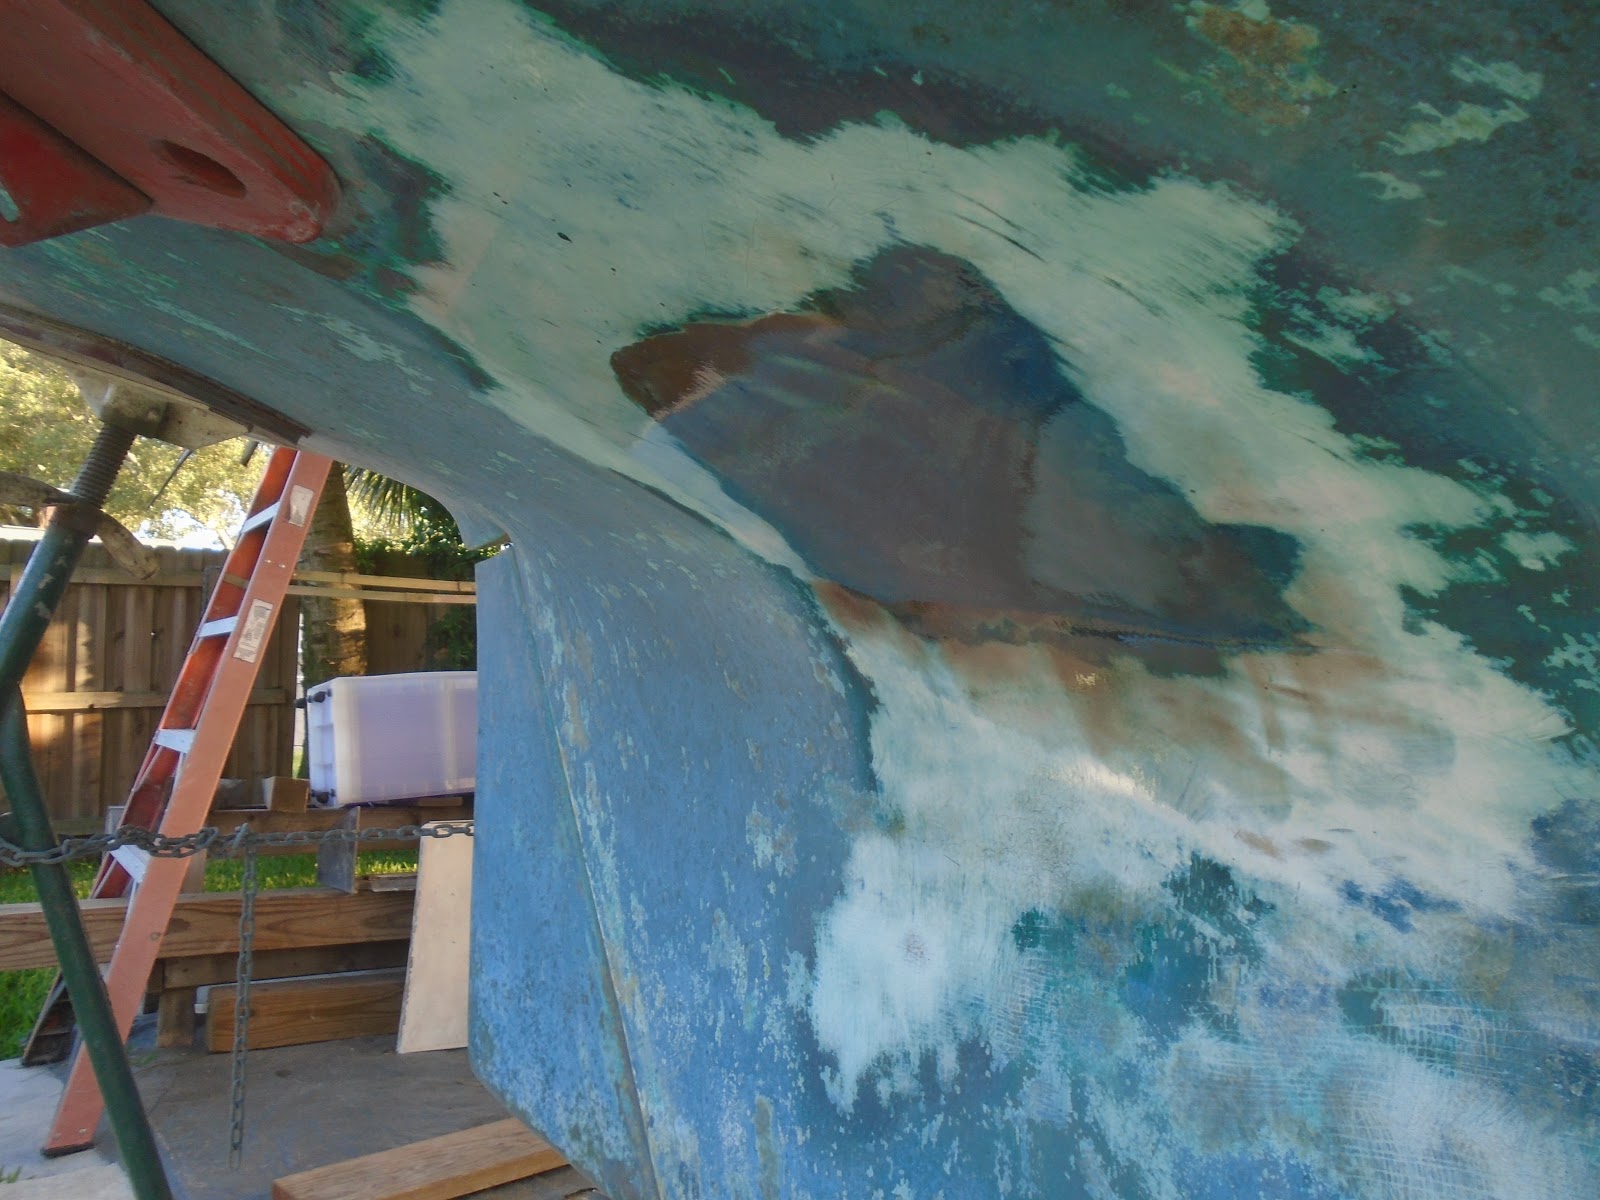
During the day, I worked on the thru-hull patches.  First, I water-washed the previously applied, and now cured, thickened epoxy fairing compound, and I then sanded to knock down the worst of the offenders - those standing far too proud to the surrounding hull.


I worked from starboard forward to starboard aft, sanding with 80-grit discs and the 60" DA sander.


I continued around to the port forward...


...and then concluded on the port aft.  I did come back with the 5" DA sander to work some finer detail into the effort in order to prepare for the final round of fairing compound.


Each of the patches were good enough for bottom paint and then go sailing, but I really needed to address a few low spots and voids....and, well, while I had things down to the bone, I wanted my work to reflect what the owner expects in his old girl!  


I first wiped the surfaces clean with acetone to prepare for additional epoxy work, and then painted out the surfaces with epoxy resin (not thickened, or otherwise known as "neat" resin).


I then used a squeegee to apply thickened epoxy resin to the patches, filling in those last remaining low spots and voids.


I will come back, water-wash and sand, and as a final sealer coat, apply neat epoxy resin to guard against water intrusion.  When the Allied 24 leaves my yard, the owner will be ready for a quick sanding of the bottom and a fresh application of bottom paint prior to splashing his old girl.


Before knocking off for the day, I moved up to the bow deck.  There was a bit of unfairness to the surface of the bow that still needed to be addressed, so with the 6" DA sander in hand, I knocked down the high spots.  I solvent-washed the surface and headed back to the shop to mix up a batch of thickened epoxy.


Using a lengthy trowel, I applied the thickened epoxy to the freshly prepared surface, working the fairing compound into the low spots.  Satisfied with the fairing application, I'm now looking forward to sanding with a longboard to bring the surface to the point where I can apply primer.


Total Time Today: 7.25

Saturday, May 11, 2019

Painting Lockers & Bilge, and Fairing Thru-Hull Patches


May 11, 2019


A milestone day - paint in the lockers and bilge!  In order to move forward with the final installation of the new v-berth platform tops, I really needed to get the lockers painted, and would have been done sooner except for the recently installed small bulkheads at the aft of the existing fiberglass v-berth and the supportive cleats on the primary bulkheads to support the new platform tops.  Well, with those two lingering tasks completed last week, I was now ready to paint the lockers.

Last week I thoroughly vacuumed and solvent-washed the hull surface inside the lockers, but I repeated the same exercise today to ensure that I retrieved any newly found debris.  


With the prep work complete, I returned to the shop and mixed the two-part epoxy paint that I'd using to paint the lockers and bilge surfaces.  I chose an epoxy barrier coat paint that stands up exceptionally well to oil, grime, and even water intrusion.  This paint is designed to be applied above and below the waterline, as a barrier coat prior to bottom paint.  The TotalBoat TotalProtect epoxy primer and barrier coat product will perform well in this environment. 


I got started in the forward center locker, and then made my way aft by first painting the port side locker and then the starboard locker.  As can be seen on the photos, I also painted out the small cubbies aft of the v-berth platform and forward of the primary bulkheads.  With the new v-berth platform top installed, as well as some netting to secure stowed items, these cubbies will serve as useful storage for items regular called in to service.


I dropped down to also paint the small void below the old head platform - the two thru-hull patches can also be seen (with sanding and fairing work yet to be done on them both).  I new top will be installed here, with a hatch to access and clean the space below.


I continued moving aft in the boat, and painted out the primary access to the bilge.  The support structures proved a bit of a nuisance to brush and roller, but I valiantly completed the mission.


Next, I moved up to paint out the lockers beneath the cabin settees.  I started to port, and then moved over to the starboard settee.  I left a roughly 7" x 7" square in the inboard-aft portion of the locker for future installation of new seacocks to handle the cockpit and side deck drains.


With the lockers painted, I then moved to the portion of the hull surface just aft of the saloon settees and back to the athwart ship bulkhead spanning underneath the midpoint of the cockpit well.  the pictures above and below show the painted surfaces. 


I also painted the turn of the bilge and down into the bilge itself (shown below).  In all, I applied three coats to all surfaces described in the text above.  I painted continuously, since by the time I completed one coat, the paint had tacked to the point that it was ready to overcoat with the second coat, and finally the third coat.  


With the painting finished for the day, I moved outside the boat to complete the patching work on the old thru-hulls that I had removed.  I started forward, on the starboard side of the boat.  This thru-hull patch required another layer of 1708 biaxial cloth since my timing in the first attempt was a bit tardy and the epoxy kicked to the point that I could not apply subsequent layers of 1708 cloth.  So, I started with a water-wash of the cured epoxy, and the towel dried the surface. 


I moved around the boat, removing the peel ply that I had applied to the cured patches consisting of multiple layers of 1708 biaxial cloth.  


It wasn't necessary, as was the case with the forward starboard patch, to sand the balance of the cured patches since I used peel ply to remove the amine blush (wax), but I did do a light sanding with 80-grit discs on the small 5" DA sander. 


I quickly sanded all four of the cured patches, but spent more time on the forward starboard patch since another layer of cloth would be applied today.


To that end, I made a template of the required layer of 1708 biaxial and then removed it from the material I had in the shop.  I returned to the boat and wiped the surfaces within each patch with solvent to clean them prior to epoxy work.  With everything prepped, I mixed a batch of epoxy resin and wet out the forward starboard final layer of biaxial, and wet out the surfaces on the boat themselves with the balance of the leftover neat resin.


I returned to the shop and mixed a batch of thickened epoxy resin - thickened with 406 colloidal silica and 407 low-density filler - and prepared to take it to the boat.  I took the now wet final layer of cloth to be applied to the forward starboard patch, and the thickened epoxy, over to the boat.  I set the final patch in place, and with a large trowel applied the thickened epoxy over the patch, filling the weave and the balance of depressions around the patch area.  


I then moved aft on the starboard side and applied thickened epoxy to this thru-hull patch.


I made a quick trip back to the shop to mix another batch of thickened epoxy, and returned to the boat to apply the fairing compound to the forward port thru-hull patch.


Finally, I moved aft on the port side to complete the fairing of the thru-hull patches.  In the coming days, I will water-wash the cured fairing compound (thickened epoxy), and sand the surface to fair.  A coat of epoxy barrier paint will be applied over the patched and faired old thru-hull locations, prepping it for bottom paint in the future.


Total Time Today: 5.25 hrs

July 29, 2020 The day had arrived!  Time to apply the name of the vessel...S/V Sea Hagg, hailing out of Key Largo (there's on...