Wednesday, July 29, 2020


July 29, 2020


The day had arrived!  Time to apply the name of the vessel...S/V Sea Hagg, hailing out of Key Largo (there's only one Key Largo!).

I made it down to Sea Hagg just in time to endure a tremendous thunderstorm, so I hung out in the car for nearly an hour awaiting the passing rain.  I finally set up a large golf umbrella on my ladder to shield the rain from the transom, and got started.

I first aligned the Allied 24's name, and then secured it in place.


I then turned to the hailing port, Key Largo.  She has a good-looking transom!


my next task for the day was installation of a locking mechanism in order to secure the cabin below.  Due to the hatch and drop board construction and assembly, I decided on a keyed cam lock to prevent unwanted visitors from going below.  The cam lock is 316 stainless, and should stand up well with the environment. 


I marked for the location for the installation, and used a small hole saw for the keyed barrel of the lock.


I then assembled the various components of the lock, and checked its efficacy. Check!


Her rig is nearly ready, she is nearly ready, her owner is READY!


Total Time Today: 2 hrs


Sunday, July 26, 2020

Final Install of Torqueedo Motor Components & Cabin Paint


July 26, 2020


Getting ever closer to the splashing Sea Hang, there were still a few items left on the list.  Today I set out to complete the installation of the various Torqueedo components, and specifically the emergency shut-off switch and the power switch.  

First, I tackled the emergency shut-off switch, and decided to locate it aft of the throttle control and next to the display unit and tiller head (just out of the picture).  I drilled for the diameter of the component, and due to the thickness of the cockpit settee I had to drill and remove material in the interior of the locker in order to recess the shut-off switch.  


The installation was straightforward after having solved for the laminate thickness issue.  


I moved on to the power switch, which I decided to locate in the cabin for obvious reasons.  True, there is a battery switch, but I simply wanted a redundancy of safety for operation of the motor, and so opted to locate the power switch down below.


Installation was simple, after measuring for the diameter of the threaded power switch unit, I chose the appropriate hole saw and made the opening.  For all of the installations I made today, I came back and installed zip tie brackets.  This involved roughing up the backside of the brackets and the surface of the fiberglass upon which they would be installed.  I then wet the surfaces with neat epoxy, applied a small amount of thickened epoxy and then set them in position to cure.  


My final task for the day was to apply a fresh coat of paint on the cabin settees and the landing platform.  After scuffing up the surface with 320-grit paper, I wiped the surfaces clean and then applied the Interlux Premium Yacht Paint.  The boatyard is a necessary visit from time to time, but as one performs work on the boat, the boatyard takes a toll on the boat! 


The fresh coat of paint really brightened things up...and is a simply and quick maintenance item.


The landing platform ready for stepping....after she's dry of course!


Total Time Today: 3.5 hrs

Saturday, July 25, 2020

Installing the Repaired Port Coaming Block Cap, Bow and Stern Chocks


July 25, 2020


Making my way to Sea Hagg this morning, I set out to reinstall the repaired port coaming block cap.  At the boat, I took the varnish down to near bare wood, then installed the cap.  I followed the installation with bunging the fasteners holes in a process involving using the Epifanes varnish as a glue of sorts.  Next, I knocked down the height of the bungs with a small chisel, and then fine-tuned the surfacing with sand paper.  I immediately followed this work with a solvent wipe down and then application of varnish.


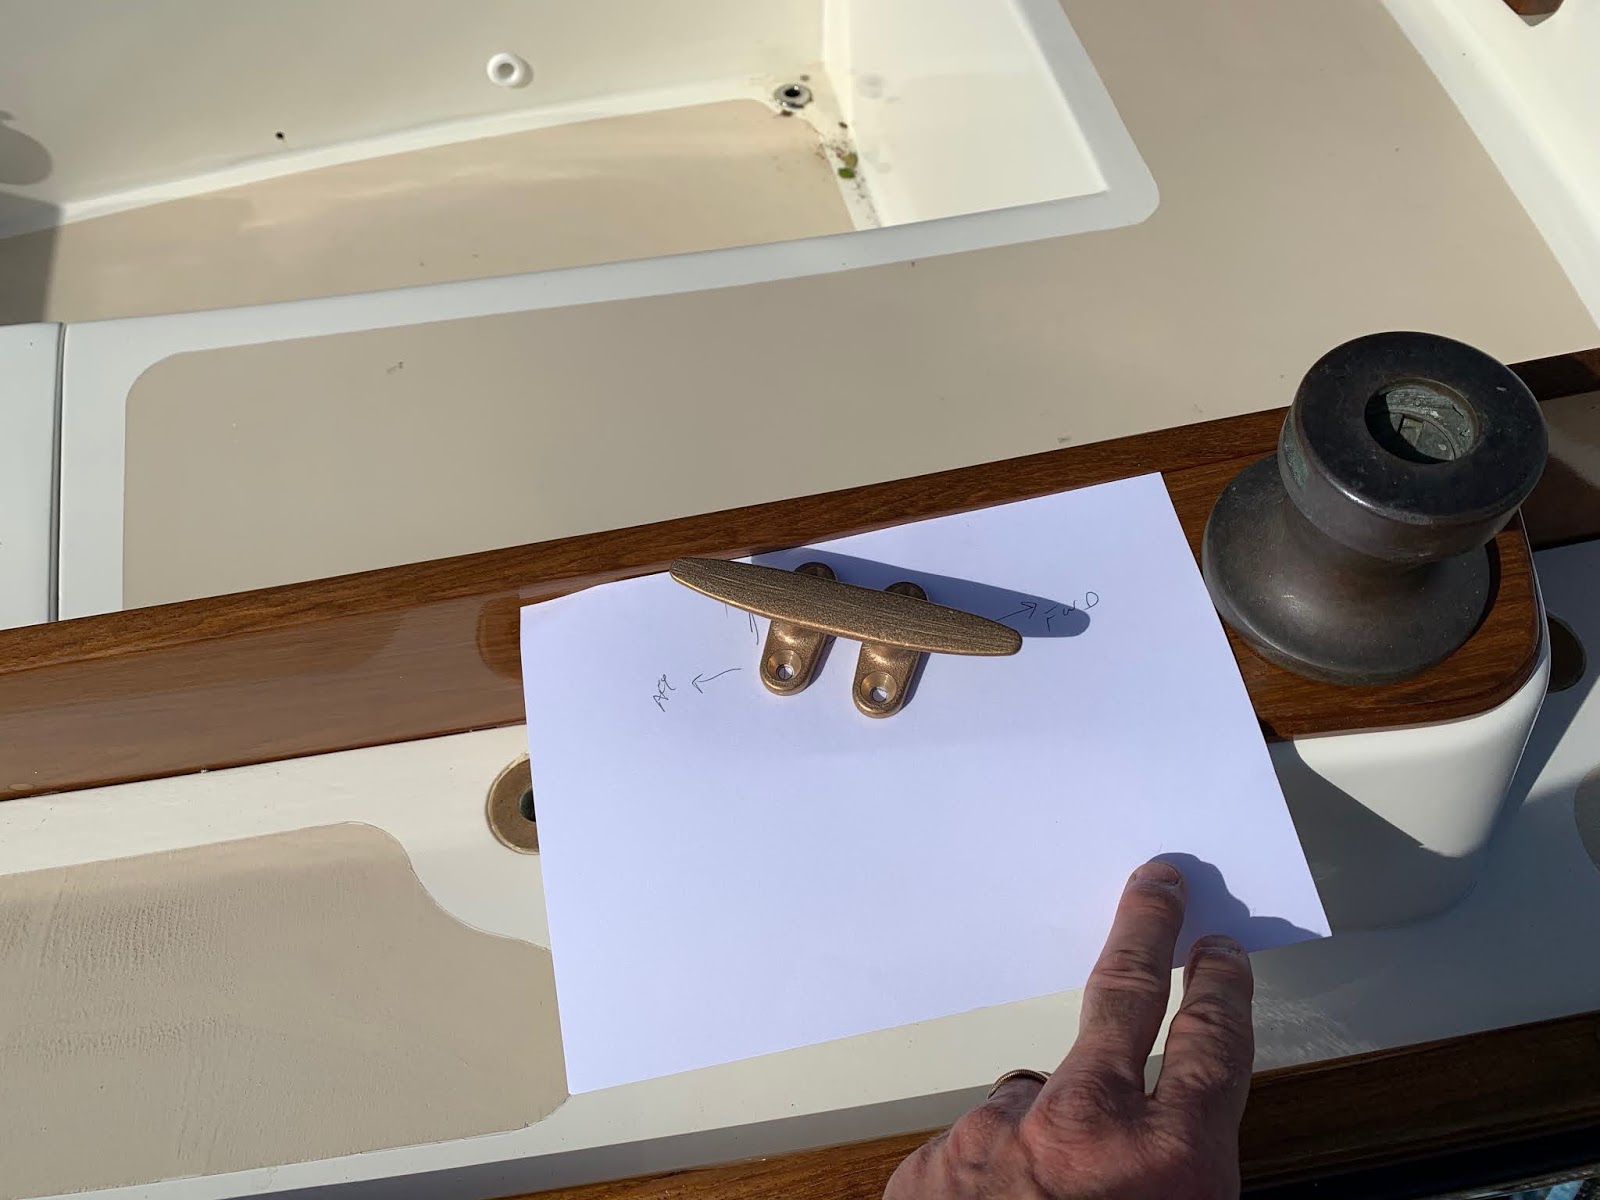
On to the primary work - installing the chocks on the bow and stern.  The chocks serve to tame the docking, mooring, anchoring lines as they are tied off on the deck cleats.  I started at the bow of Sea Hagg, finding the near precise positioning of the chocks due to the location of the foredeck cleat, the toe rail fasteners, and the hull-to-deck joint fasteners.  I accomplished this by going below and taking measurements of the hull-to-deck joint fasteners from the toe rail fasteners.  Doing this left me with a rough area of potential installation; and the chocks needed to be more forward of the foredeck cleat.


After arriving at the location of the chocks, I marked and pre-drilled in order to tap for 1/4"-20 silicone bronze machine screws.


After tapping the fastener holes, I then used a countersink bit to create a taper at the mouth of the fastener hole, this would allow for a good amount of Sitka Flex 291-LOT to bed around the opening.  I bedded the chocks and set the machine screws in place, squeezing out an ample amount of bedding compound.


Next, I went below and installed 1/4" silicone bronze washers and nuts, followed by a stainless steel locking nut with a nylon insert.


I cleaned up the Sitka Flex bedding compound squeeze out, and this completed the installation. 


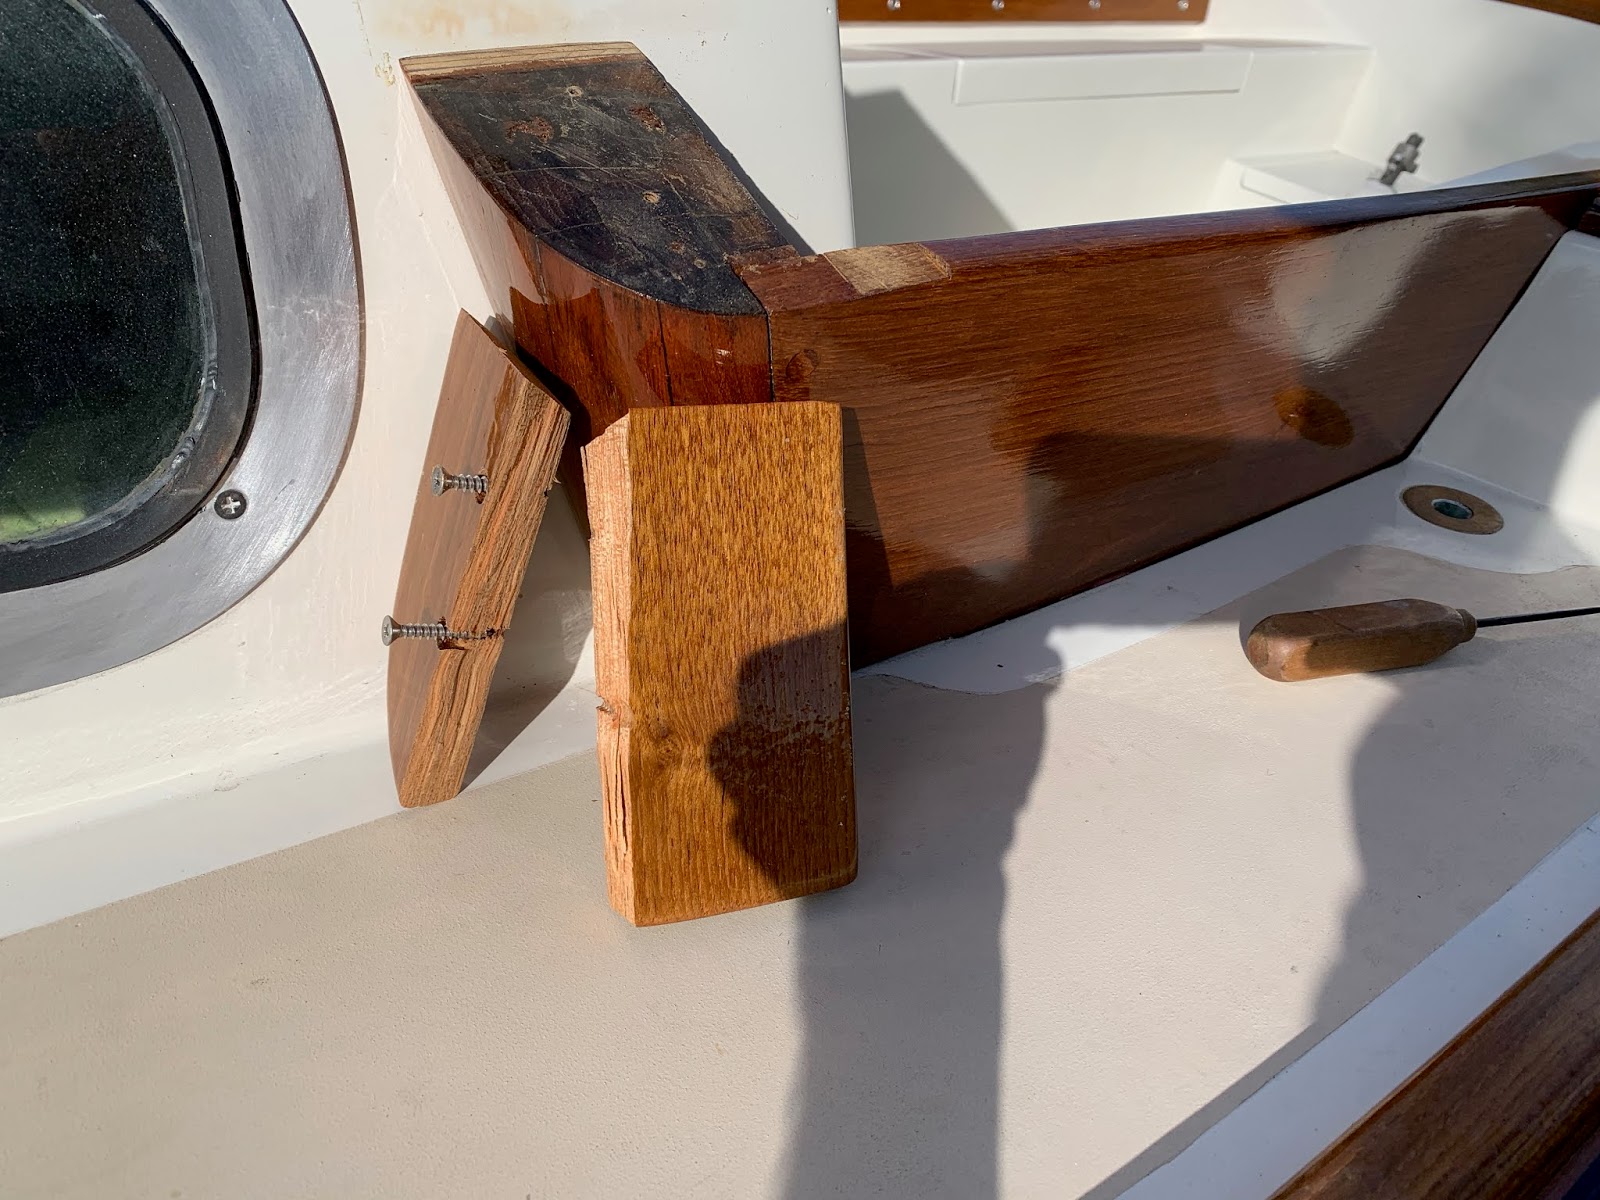
I then moved to the taff rail and essentially repeated the process of laying out, marking, pre-drilling, and then tapping the fastener holes for the aft chocks.


With the fastener holes drilled and tapped, I then countersunk the mouths of the fasteners holes to allow for bedding compound.


I installed the chocks with a good amount of Sitka Flex 291-LOT, cleaning up the squeeze out, and then securing the washers and nuts from below.  This completed installation of the chocks.  I also cleaned up the surfaces of the chocks with light sandpaper to slightly polish them.  Over time, the chocks will develop and patina once again...but for now...


Total Time Today: 3.5 hrs

Thursday, July 23, 2020

Repair to the Port Coaming Block Cap, and Installing Winch Cleats (for Jib Sheets)


July 23, 2020


I managed to get over to the shop in the late afternoon to make repairs to the port side coaming block cap.  The cap was damaged in the process of other work being performed on the boat, but the silver lining was that the break was clean and could easily be solved with the application of thickened epoxy and clamps.

I cleaned the surfaces of the two pieces with acetone to remove any residual teak oils, and then wet those same surfaces with neat epoxy (not thickened).  With the remaining epoxy in the cup, I added a combination of 406 colloidal silica and teak wood flour (fine sanding dust that I collected after sanding many board feet of teak).  I applied this thickened mixture, now more or less the color of teak, to the break and then clamped the pieces together securely.  I added clamps to the sides as well as to the top and bottom.  Installation to come in a day, or two.


While I was at the shop, I collected some of the older 1/4"-20 silicone bronze machine screws from when I deconstructed her deck hardware.  I cleaned the usable pieces up for use in the installation of the winch cleats.  These winch cleats would be used to secure the jib lines as they are sheeted in.

At the boat, I made a paper template for the location of the starboard cleat, and having symmetry between the port and starboard winch pads meant I could simply flip the template for the port installation.  I marked the location for the starboard cleat's fasteners on the template, and then drilled for two of the four,  opposite of one another.  I drove the two 1/4" fasteners into these holes to secure the cleat, and then drilled the remaining two fastener holes.


With the holes pre-drilled, I then tapped for the 1/4"-20 silicone bronze machine screws.  Lastly, I tapered the openings with a countersink bit.


I applied a bit of Sitka Flex 291-LOT to the holes as well as the screws, and then seated and secured them.  This finished the installation of the starboard winch cleat.


As I mentioned early, I simply flipped the paper template for the process of locating and drilling out the holes for the port winch cleat.  I repeated the same process through to applying the bedding compound, seating, and securing the machine screws.


This finished the installation of the port side winch cleat.  


The final task for the evening was to take some measurements on the stern for her name lettering.

Total Time Today: 2 hrs

Wednesday, July 22, 2020

Port and Starboard Cove Stripe, Plus Removal of Port Coaming Return Block Cap (Repair)


July 21 & 22, 2020


Over the last couple of days the cove stripe has been the focus.  I began with the port side of the boat with the following process: carefully apply tape to protect the topsides from application of the cove stripe paint, sand the cove stripe, clean with solvent, and then apply three coats of paint.  

The paint I chose for Sea Hag's....yes, we have a name for the Allied 24!  More on that later.  The cove stripe paint applied is the TotalBoat TotalGold metallic paint, a perfect option for cove stripe work. 


The paint went on without issue, and so I followed the clean up of tools and materials with removal of the protective tape.


The following day, I repeated the steps taken on the port side with that of starboard side's application of the TotalGold metallic paint.


After discussing the issue of applying her name, it was decided to repeat the gold theme of the cove stripe for the naming letters.


Boat yards are a heck of a place, just incredibly dirty with this and that blowing around in the air whilst owners work to bring their vessels back to the water as quickly as possible.  We had a some minor to the port side coaming block cap that would require removal and repair.


There was a clean break in the piece, so really will be no issue to effect a repair that will eliminate any weakness in the seam between the two pieces.  I will be sanding down the surface, installing, and sealing with two new bungs, followed by varnish work to button everything up.


Total Time Over Two Days: 4 hrs

Monday, July 20, 2020

Varnishing Work


July 20, 2020


The focus this evening was to sand the rails and apply a coat of varnish.  The following photos are simply sexy varnish work....


Total Time Today: 1.5 hrs

Sunday, July 19, 2020

Installing Throttle, Display Unit for Throttle, and Charger


July 18, 2020


I set out in the cooler part of the afternoon to continue the path forward on the Torqueedo power plant and control systems.  Today it would be the throttle, it's display unit, and the battery charger.  Unfortunately, I overlooked taking a photo of the battery charger installation so I will briefly explain. In a previous work session I had fabricated a mounting board that in turn was epoxied to the interior wall of the port-side cockpit well.  Today, I then mounted the battery charger onto the mounting board, securing with washers and #10 wood screws.  The location was good for wiring runs to the battery itself as well as to make connections to the balance of the Torqueedo electronics.

Next, I turned my attention to the throttle.  Sitting in the cockpit, simulating steering the boat with the tiller, I located an out of the way yet accessible location for the throttle controls: just below the port settee locker.  This location also allowed for easy wiring access to the Torqueedo electronics box.  I applied a layer of protective tape, for the drilling process, and then oriented the template to remove the meat of the fiberglass and allow the throttle to recess in its final position.

I first drilled small pilot holes with a ver small bit in order to "lock in" the location of where I needed to drill for fasteners and with the hole saw.  With the template's drilling locations now transferred onto the wall of the settee I moved straight into using the 2.5" hole saw to allow the guts of the throttle unit to pass through the settee wall, and then followed with drilling for the mounting screws.


As can be seen below, the throttle unit went in without issue.  Next, I moved onto the display unit.  The display unit provides time left on the battery's kW usage, battery %, and other data.  I chose a location that was accessible and yet was not in a place that hurt the aesthetics of the cockpit well.


There was not a supplied template for this unit, so I took several measurements and transferred those onto the layer of protective tape that I had applied to the settee.  I used a hole saw again to remove most of the material that needed to go, and then cleaned up, further refining the opening, to allow the display unit to be installed.  I finished up the installation prep with drilling for the fasteners.


I seated all screws with a bit of polysulfide bedding compound, and then cleaned up any resulting squeeze out.  


Total Time Today: 2.25 hrs

July 29, 2020 The day had arrived!  Time to apply the name of the vessel...S/V Sea Hagg, hailing out of Key Largo (there's on...